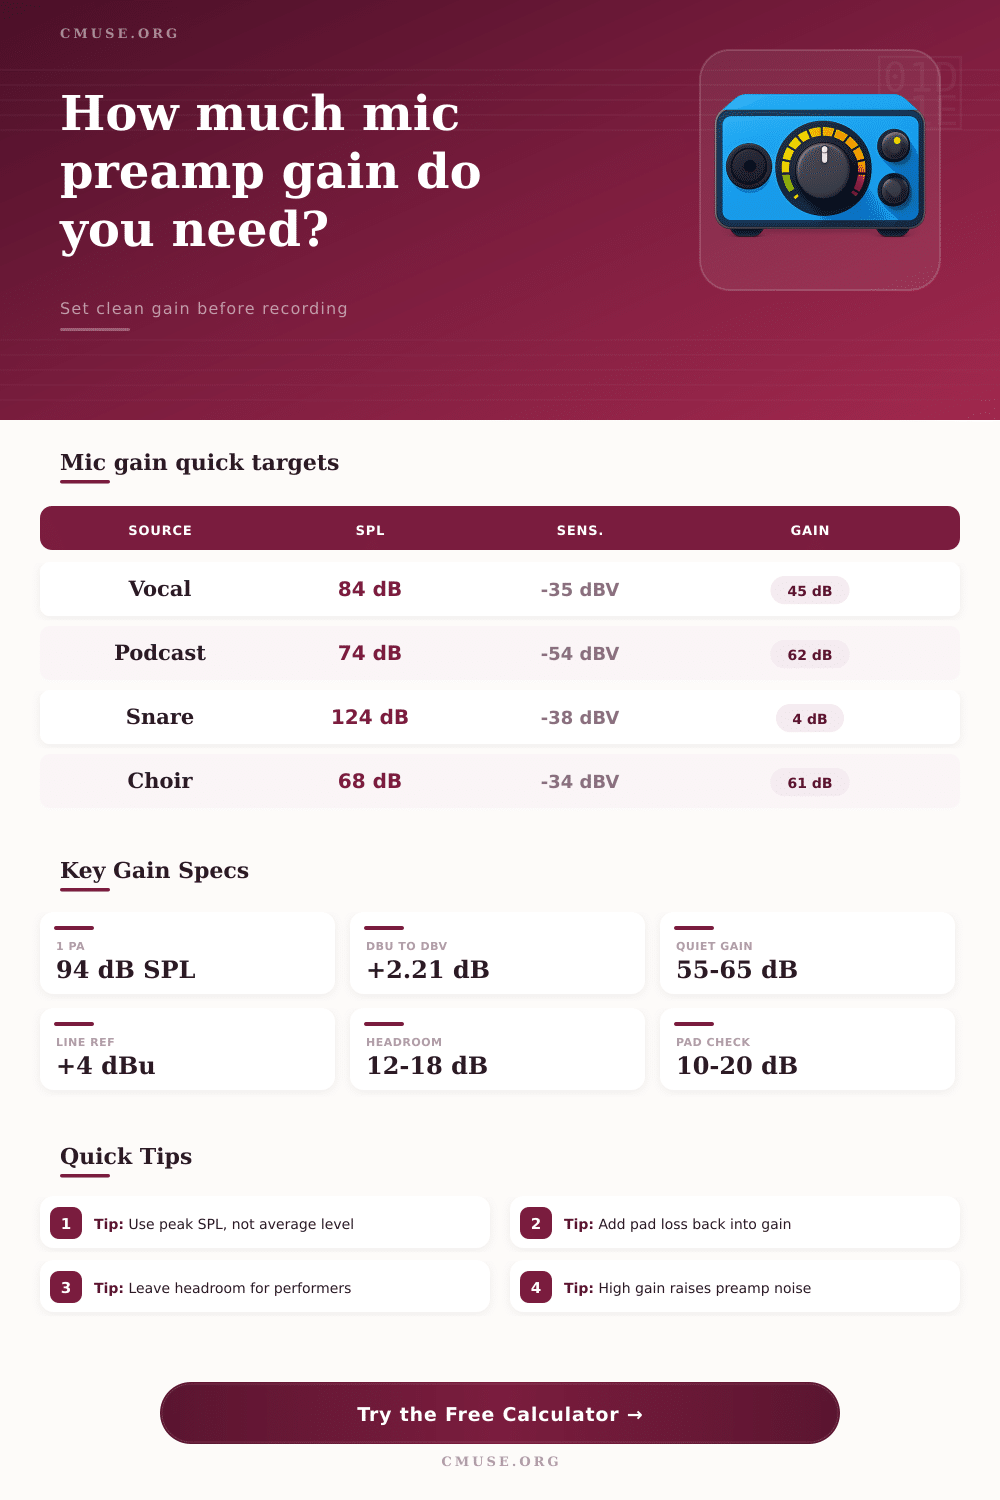
Mic Preamp Gain Calculator
Estimate how much gain a microphone preamp needs from mic sensitivity, sound pressure level, input pad, converter reference level, headroom target, maximum gain, and noise performance.
Load a realistic recording scenario, then adjust the mic sensitivity, source SPL, pad, and converter target. The calculator keeps the gain math in dBu so it lines up with studio interface and preamp specifications.
Formula Breakdown
Sensitivity
dBV/Pa = 20 log10(mV/Pa / 1000)
Mic Level
Mic dBu = sensitivity dBV + SPL - 94 + 2.214
Output Target
Target dBu = ADC 0 dBFS dBu + desired dBFS
Gain Needed
Gain = target dBu - mic dBu + pad - headroom
| Microphone type | Typical sensitivity | mV/Pa equivalent | Gain implication |
|---|---|---|---|
| Passive ribbon | -56 to -50 dBV/Pa | 1.6 to 3.2 mV/Pa | Usually needs high clean gain on quiet and moderate sources. |
| Broadcast dynamic | -59 to -53 dBV/Pa | 1.1 to 2.2 mV/Pa | Often needs 55 to 70 dB for close speech without a booster. |
| Moving-coil dynamic | -55 to -48 dBV/Pa | 1.8 to 4.0 mV/Pa | Moderate on loud instruments, demanding on quiet voice. |
| Small condenser | -42 to -34 dBV/Pa | 8 to 20 mV/Pa | Comfortable gain range for acoustic instruments and overheads. |
| Large condenser | -38 to -28 dBV/Pa | 13 to 40 mV/Pa | Often needs less gain and more attention to pad/headroom. |
| Shotgun condenser | -36 to -30 dBV/Pa | 16 to 32 mV/Pa | Healthy output for dialog and field work at normal distance. |
| Lavalier condenser | -44 to -34 dBV/Pa | 6 to 20 mV/Pa | Gain depends strongly on transmitter, adapter, and placement. |
| 0 dBFS reference | -18 dBFS target | -12 dBFS target | Typical context |
|---|---|---|---|
| +14 dBu | -4 dBu | +2 dBu | Compact interfaces and lower-headroom input stages. |
| +18 dBu | 0 dBu | +6 dBu | Common project-studio converters and many USB interfaces. |
| +20 dBu | +2 dBu | +8 dBu | Balanced studio interfaces with moderate analog headroom. |
| +22 dBu | +4 dBu | +10 dBu | Professional line-level systems aligned around +4 dBu. |
| +24 dBu | +6 dBu | +12 dBu | High-headroom converters and outboard-heavy recording chains. |
| Source at mic | Practical SPL range | Gain risk | Headroom note |
|---|---|---|---|
| Quiet spoken voice | 60 to 72 dB SPL | Noise-limited with low-output dynamic and ribbon mics. | Use lower room noise and enough clean gain before boosting later. |
| Close podcast speech | 70 to 84 dB SPL | May need 55+ dB with broadcast dynamics. | Leave room for laughter and closer plosives. |
| Lead vocal peaks | 82 to 98 dB SPL | Usually manageable with condenser mics. | Reserve 6 to 12 dB for a louder chorus pass. |
| Acoustic guitar | 78 to 94 dB SPL | Condenser sensitivity usually keeps gain moderate. | Distance changes can move level faster than expected. |
| Guitar cabinet | 100 to 120 dB SPL | Pad or lower gain may be needed with condensers. | Check preamp and mic overload before converter clipping. |
| Snare close mic | 120 to 140 dB SPL | Preamp gain may approach minimum settings. | Pad first if transient peaks overload the input path. |
| Distant choir | 62 to 76 dB SPL | Room noise and mic self-noise become important. | Do not spend all headroom chasing distant ambience. |
| Preset | Mic assumption | Starting SPL | Typical result |
|---|---|---|---|
| Studio Vocal Condenser | -35 dBV/Pa large condenser | 84 dB SPL | Moderate gain with healthy headroom for chorus peaks. |
| Broadcast Dynamic Voice | -56 dBV/Pa voice dynamic | 74 dB SPL | High gain, often close to the top of small interfaces. |
| Ribbon Guitar Cabinet | -52 dBV/Pa passive ribbon | 112 dB SPL | Surprisingly low gain because the cabinet is loud. |
| Drum Overhead Pair | -38 dBV/Pa condenser pair | 104 dB SPL | Pad/headroom check matters more than gain shortage. |
| Distant Choir LDC | -34 dBV/Pa condenser | 68 dB SPL | Needs more gain and a quiet room path. |
| Field Ambience Mic | -32 dBV/Pa shotgun | 58 dB SPL | Noise margin can be the deciding factor. |
Even with a solid performance, most recording fail on the very first take because the gain structure were incorrect. Sure you have a pristine interface and a thousand dollar microphone, but your vocal track still sounds noisy and thin and clips when singer belts out a high note. More often than not, it’s not necessarily the gear at fault.
It’s what we call the “invisible” math that happens from sound pressure hitting the capsule to digital bits reaching your hard drive. Understanding voltage level is more about getting the math right different than talent. While the calculator above does all the work after you enter your own parameters, understanding results is the true labor of love here.
How to Set Your Gain Correctly
Sensitivity on microphones is typicaly expressed as either millivolts per pascal or decibels per volt, both sounding like engineer-speak lingo until you understand that they’re just telling you how much louder the microphone will be relative to a specific sound pressure level. For instance, a typical large diaphragm condenser may produce 35 millivolts at 94 decibels of sound pressure, whereas a passive ribbon mic may only produce under two millivolts for same input. The disparity is huge and this means that your preamp must work far harder for the ribbon, the first significant tradeoff.
The catch: Gain increase noise. This is rule everyone hates but must accept. When you’re using a low output dynamic mic on quiet spoken word performance, you’ll probably require clean gain of more than 60dB. That means you can hear the equivalent input noise of the preamp and you’re amplifying not only the voice but also the hiss. That’s what the calculator measure as the noise margin, how much gain do you need versus what the preamp spec says? If answer is a thin safety buffer, it is time to position the mic closer or replace it with something more sensitive before beginning to track.
On the other hand, when miking a guitar cabinet or a snare drum, the SPLs can be so extreme that they literally distort and you end up having to use a pad to reduce signal. This is one of those paradoxes that snares new people: You save your preamp but lose gain down the line.
A second bit of hidden complexity is alignment of converters, which most engineers don’t think about until they begin experiencing digital clipping. Even though your preamp may have LEDs glowing bright with no problem, they might be outputing a level hotter than what your analog to digital converter can accepts without clipping. This level is often plus eighteen or plus twenty two decibels, which is max level an interface can handle.
The tool takes all this into account by allowing you to specify in decibel FS how hot signal you want your peak level to be before zero dBFS, then converts this to voltage levels that your preamp should of target, ensuring that when you aim for negative twelve decibel FS, you’re really reaching the appropriate analog voltage right at the input stage, not making a guess as to where the lights are flickering.
The last variable is headroom. This one’s frequently overlooked and then calculated too precisely. You aim for your intended level when someone speaks at a normal volume but you neglect the fact that a laugh, a sudden instrumental attack, or an ad lib could instantly add 10db more sound within a millisecond. To avoid having that brief peak distort the digitally recorded signal, leave some headroom on your settings. Better to record slightly lower and bring up in post than to cut top off a performance that can’t be repeated.
The tool’s presets reflect all this, providing starting places for typical situations such as capturing distant choirs (extreme noise and gain requirements) or broadcast-voice levels. Gain is about physics. In summary, gain setting are a matter of physics and expectations. There’s no magic. You can’t make a sound out of nothing. If you push too hard into the voltage limits of your converter, you’re going to get nasty things happening.
Running this math before you hit “record” takes the guess work out of process and puts engineering into it. Now you’ll know just how far to move the mic or how much to turn the knob. This ensures that when you put your headphones on what you hear is a true representation of source rather than an artifact of bad gain staging.
Oftentimes the best recordings are the ones where no one ever noticed how good the tech was… precisely the point.