Fade Out Time Calculator
Convert BPM, bars, beats, dB depth, fade curve, automation resolution, sample rate, and outro tail into practical mix or mastering fade timing.
🎵 Mix And Master Presets
Presets load real outro shapes for different production contexts. Change any value after loading to match the printed mix.
⚙ Fade Timing Inputs
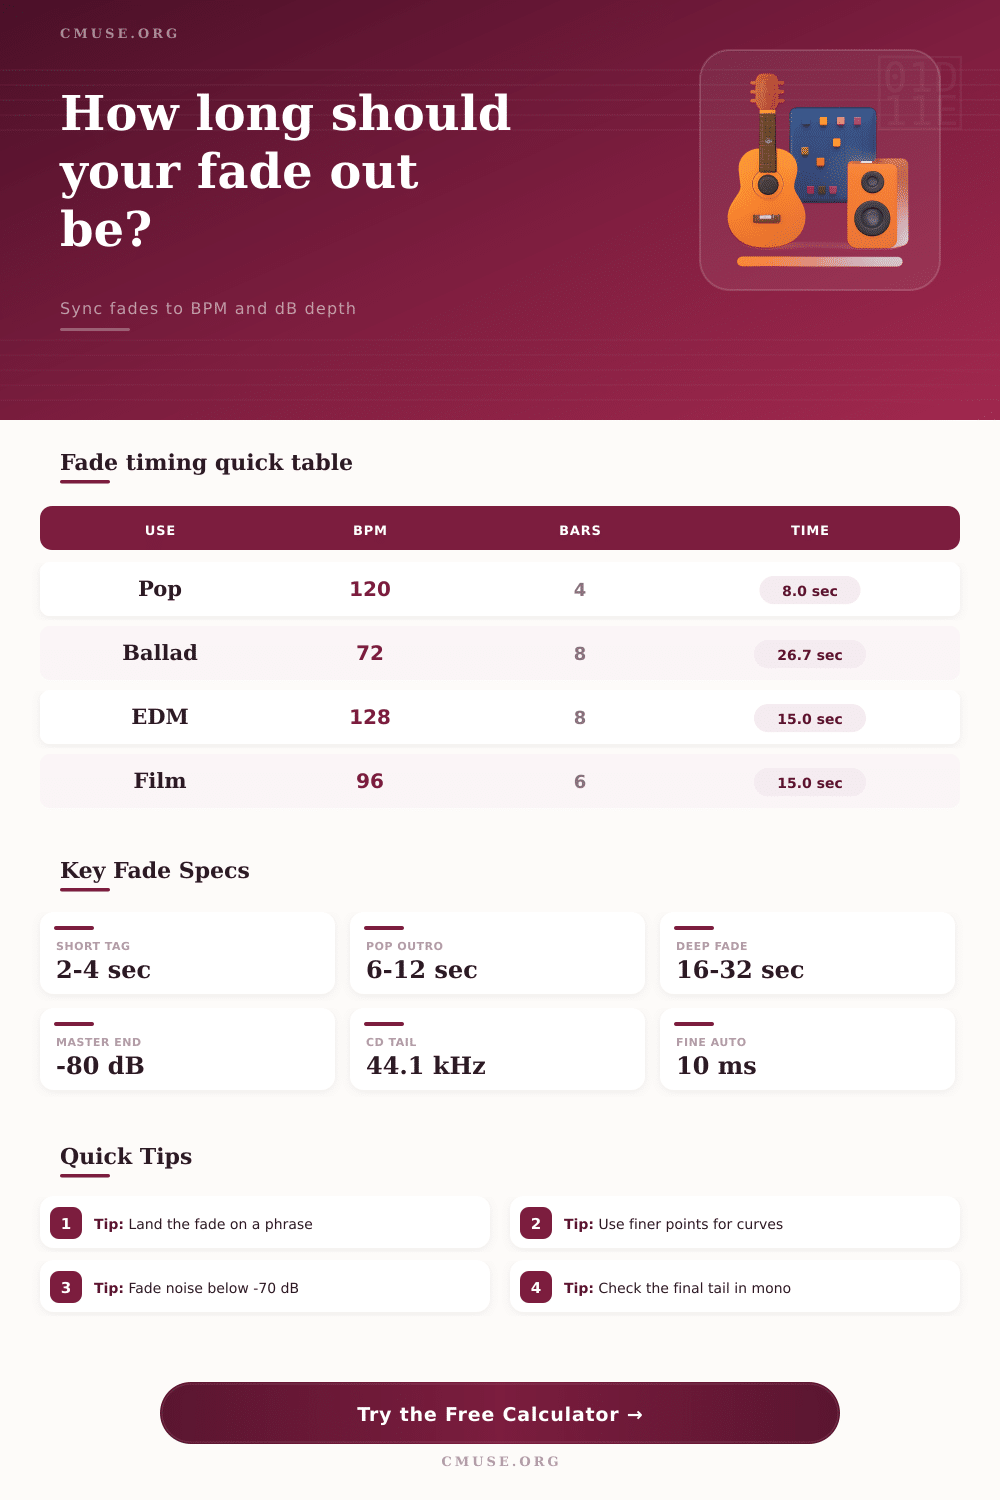
Fade Out Timing Result
Your BPM-synced fade timing and automation depth will appear here.
📊 Fade Spec Grid
⏱ BPM Fade Length Reference
| Bars in 4/4 | Current BPM | 90 BPM | 120 BPM | 128 BPM | 140 BPM |
|---|---|---|---|---|---|
| 2 bars | 4.00 sec | 5.33 sec | 4.00 sec | 3.75 sec | 3.43 sec |
| 4 bars | 8.00 sec | 10.67 sec | 8.00 sec | 7.50 sec | 6.86 sec |
| 8 bars | 16.00 sec | 21.33 sec | 16.00 sec | 15.00 sec | 13.71 sec |
| 16 bars | 32.00 sec | 42.67 sec | 32.00 sec | 30.00 sec | 27.43 sec |
🎛 Fade Curve Comparison
| Curve | Midpoint Behavior | Best Use | Watch For |
|---|---|---|---|
| Linear dB fade | Half the dB range at halfway | Predictable master fades and stem prints. | Can feel abrupt at the very end. |
| Equal-power smooth | Holds musical energy longer | Dense mixes, reverb tails, and full-band endings. | May sound too present late in the fade. |
| Slow start, steep ending | Most level drop happens late | Phrase endings that should stay strong. | Needs enough tail to avoid a chopped ending. |
| Fast start, gentle ending | Level drops early, then glides | Dialogue beds and transparent background fades. | Can make music vanish too soon. |
| S-curve automation | Soft beginning and soft end | Natural-sounding mix bus automation. | Requires fine automation resolution. |
| Exponential deep fade | Strong early drop into very low tail | Noise-sensitive masters and long ambient endings. | Check dither and noise floor near the end. |
📉 Automation And Sample Resolution Table
| Resolution | Points In 8 Sec | Points In 16 Sec | Typical Use |
|---|---|---|---|
| 5 ms | 1601 | 3201 | Very fine rendered envelope or clip gain work. |
| 10 ms | 801 | 1601 | Clean DAW automation for curved master fades. |
| 25 ms | 321 | 641 | General mix automation with light point density. |
| 50 ms | 161 | 321 | Broad volume moves that do not need tight shaping. |
| 100 ms | 81 | 161 | Rough fades or offline planning before redraw. |
📋 Mix And Master Preset Reference
| Preset | Fade Shape | Depth | Runtime Goal |
|---|---|---|---|
| Pop Radio Outro | 4 bars, linear dB | 0 to -78 dB | Clean phrase fade before the final hook tail. |
| Ballad Long Fade | 8 bars, equal-power | 0 to -86 dB | Long emotional ending with a gentle reverb falloff. |
| EDM Break Exit | 8 bars, S-curve | 0 to -72 dB | Phrase-aligned transition out of a loop or breakdown. |
| Podcast Music Bed | 2 bars, fast start | -6 to -90 dB | Music disappears under speech without a level jump. |
| Ambient Deep Fade | 32 bars, exponential | 0 to -96 dB | Very long end where the texture sinks below noise floor. |
A fade out is used in songs that need to feel finished rather than stopped. A fade out does more than lower the volume of a song; it decides how much of the last musical phrase the listener remembers. If you fade out too early, you may erase a last hook of the song.
If you fade out too late, you’re song may end in awkward silence. The length of the fade out must match the tempo of your song. Additionally, you must decrease the volume in a way that makes your songs musical elements dissapear in a satisfying way.
How to make a smooth fade out for a song
The length of a fade out is measured in musical time, not seconds. For instance, if your song is playing at a tempo of 120 beats per minute in 4/4 time, four bars of music play for eight seconds. An eight-second fade out works well for many pop songs with outros.
However, at a tempo of 72 beats per minute, four bars play for almost eleven seconds. At 72 beats per minute, eight bars of music play for twenty seconds. An eight bar fade out at this tempo may seem long.
Use a calculator to determine the length in seconds of each bar in your song so that you can determine the length of your fade out in seconds. You will not want to count the beats on a calculator application while setting your fade out length. The decibel (dB) range of your fade out is important.
For most songs, a drop from 0 dB to minus 80 dB is all that is needed. Using a shallower dB range may leave listeners with a tail of sound that competes with silence on streaming platforms. A deeper range, such dB values of minus 96 dB or lower, may be needed for songs utilizing long reverb returns.
The midpoint of the dB range also determines the feel of your fade out. Using a linear dB value for your fade out will make each portion of your songs elements fade at the same rate. Using an equal-power curve allows the songs elements to retain there musical energy in the middle portion of your song.
This is useful for songs with heavy instrumentation in the middle of the song. Automation resolution sits one level deeper into the settings for your song than the choice of curve shape. For example, if you choose automation every 100 milliseconds, it may not be smooth when you zoom in on the songs timeline.
Automation every 10 milliseconds will usually result in a smooth fade out. The automation calculator will provide the total number of automation points for your song. The sample rate of your song also affects the length of your fade out.
For example, an eight second fade out at 96 kHz will have twice as many samples as an eight second fade out at 48 kHz. This affects how you are to dither your song. In the recording of a song, it is possible that you must adjust the fade out.
For example, the last chord of a live song may need to be allowed to ring for a few extra seconds. Additionally, if a vocal takes a held note, the fade out may need to begin after the singer takes a breath. The musical phrase, however, rules the fade out.
It must begin on a downbeat or after a line sung by the vocalists. The automation calculator will allow you to add extra beats to your song after the bar count to test whether a pickup or tag would work before committing to it. Many people make mistakes when they use the visual cues of a song to determine the length of a fade out.
For example, a song may appear to have a properly-fade-out section on the screen, but sound like it abruptly ends when heard in play. Always play your last ten seconds of the song at a low monitor level to check whether the fade out is working as it should. If it seems to end too suddenly, you must adjust the midpoint of the fade out.
If it ends too late, you must adjust the total length of the fade out. The post-fade tail is the silence that follows your song after the volume reaches its lowest point. A few hundred milliseconds of silence is all that is needed for songs to stream properly.
However, tails of up to a couple of seconds may be needed for vinyl sides or film cues. The automation calculator will allow you to add the length of the tail to the length of the song that you enter into the automation software. This ensures that the total length of your song as it plays will match the length that you intend for it to be.
Your choice of curve shape for your song will determine the feel of the last moments of your song. For example, a slow-start curve allows your songs elements to be loud until late in the songs phrase, at which point they can drop quickly. This is useful for songs that end with a dramatic last chord.
A fast-start curve allows the body of the music to be removed quickly from the song, leaving only a gentle tail of the song. This is useful for songs that feature later dialogue. Neither of these choices is universally the correct choice; it depends upon the weight of the ending that you wish to give your listeners.
Once you have set your parameters for the fade out, play the section once with the automation active and once with it bypassed. If the sequence sounds like a finished thought with automation active, you have arrived at the correct length for your fade out.