Dithering Calculator
Compare source and target bit depth, quantization step size, dither noise, noise shaping, dynamic range, SNR margin, and export suitability before the final master render.
🎛Mastering Presets
Dither belongs at the final word-length reduction: choose a release target, confirm the processing chain stays at high resolution until export, then add dither once.
⚙Dither and Word-Length Inputs
📊Calculated Spec Grid
🔍Comparison and Export Specs
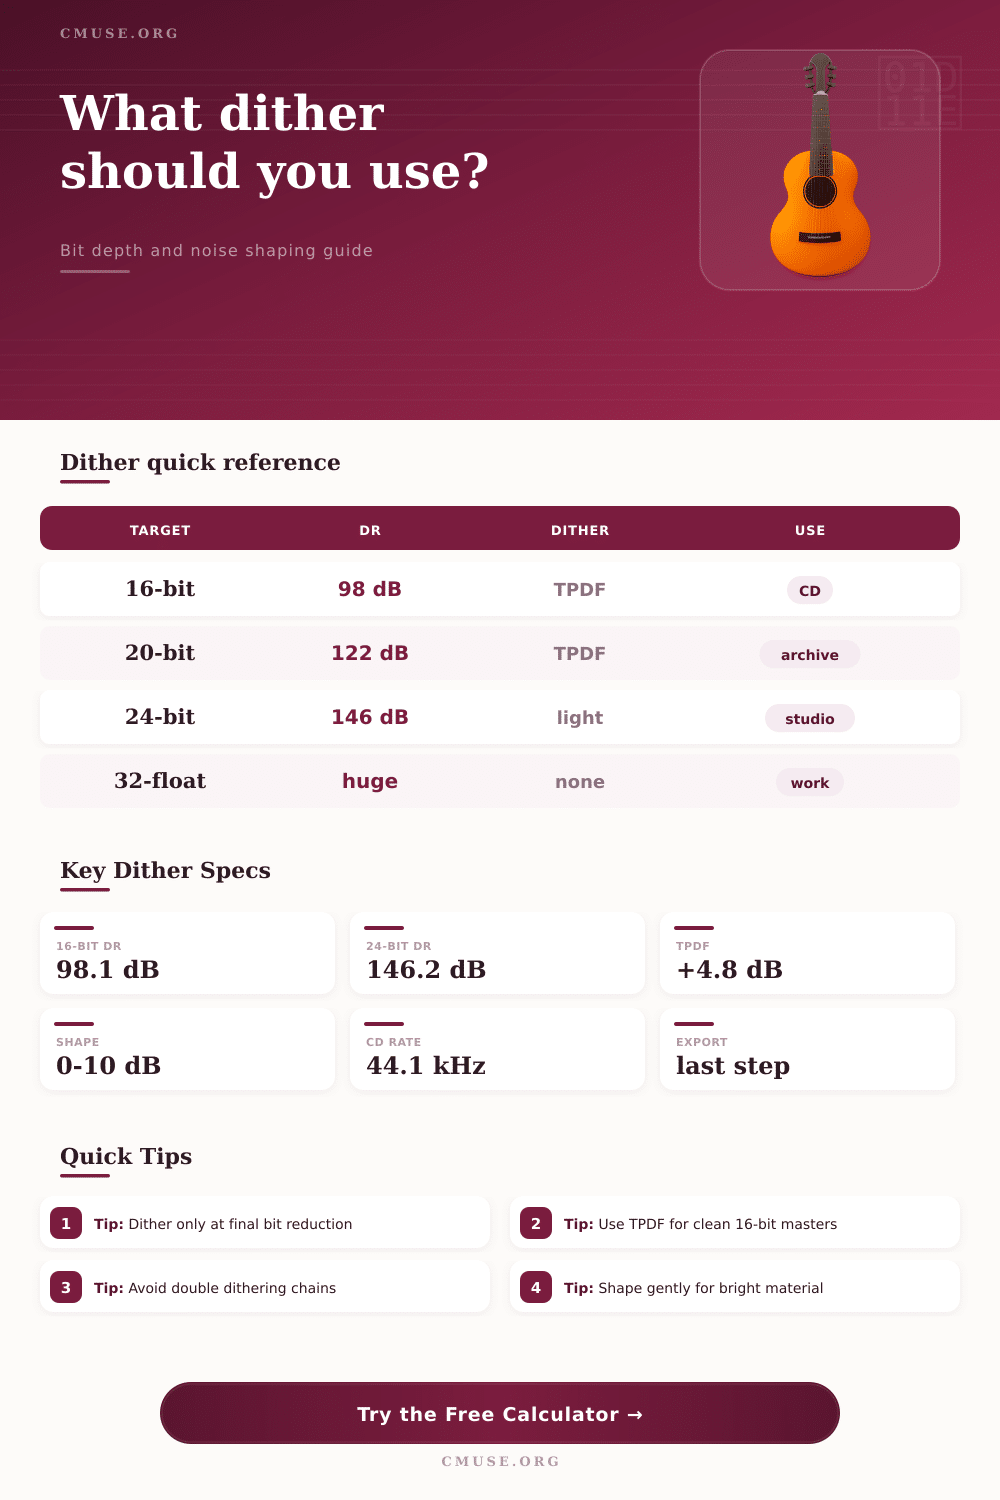
📐Bit Depth Dynamic Range Table
| Bit Depth | Ideal Dynamic Range | Typical Export Use | Dither Note |
|---|---|---|---|
| 12-bit | 74.0 dB | Sampler color, effects, constrained assets | Dither is audible and part of the character. |
| 16-bit | 98.1 dB | CD, some streaming masters, distribution files | Use TPDF or shaped TPDF at the final render. |
| 20-bit | 122.2 dB | Legacy converters and archival transfers | TPDF is normally sufficient. |
| 24-bit | 146.2 dB | Studio delivery, stems, hi-res downloads | Dither is optional but harmless when reducing from float. |
| 32-bit float | Very large | Mix handoff, restoration, processing sessions | Do not add fixed-point dither if the target remains float. |
🎚Dither Type Comparison
| Dither Type | Noise Change | Best Use | Caution |
|---|---|---|---|
| None / truncation | 0 dB added | Float exports or no bit reduction | Can create distortion when reducing fixed-point depth. |
| RPDF | About +2.1 dB | Low-level utility exports | May not fully remove modulation artifacts. |
| TPDF | About +4.8 dB | Transparent fixed-point mastering | Slightly higher hiss than rectangular dither. |
| High-pass TPDF | About +4.8 dB | 16-bit music with low midrange noise priority | Can feel brighter on sparse material. |
| Gaussian | About +5.5 dB | Special restoration or soft noise texture | Usually noisier than needed for mastering. |
🌊Noise Shaping Reference
| Shaping Mode | Weighted Credit | Audible Character | Recommended Material |
|---|---|---|---|
| Flat | 0 dB | Even broadband hiss | Loops, testing, already bright masters |
| Mild | 3 dB | Slightly lighter midband noise | Podcast, acoustic, balanced music |
| Moderate | 6 dB | Common mastering balance | CD and streaming 16-bit music |
| Aggressive | 9 dB | Very low midband noise, more top-end energy | Dense pop, rock, electronic masters |
| MBIT-style strong | 10 dB | Strong psychoacoustic shift | Careful 16-bit release masters |
📝Preset Specification Grid
| Preset | Source | Target | Dither | Noise Shape | Typical Ceiling |
|---|---|---|---|---|---|
| CD Master 16-bit | 24-bit | 16-bit | TPDF | Moderate | -0.3 dBTP |
| Streaming 16-bit | 24-bit | 16-bit | TPDF | Mild | -1.0 dBTP |
| Hi-Res 24-bit | 32-bit float | 24-bit | TPDF | Flat | -1.0 dBTP |
| Film Stem Print | 32-bit float | 24-bit | TPDF | Flat | -2.0 dBTP |
| Game Loop Asset | 24-bit | 16-bit | High-pass TPDF | Mild | -1.5 dBTP |
When you are finished mixing and ready to export your session, you will have to perform bit-depth reduction. Bit-depth reduction is an process of reducing the resolution of your audio file. This is a critical step in the mastering process because if you make a mistake during bit-depth reduction, your exported file will contain distortion or noise at a higher level than necessary.
All audio file consist of numbers once they are converted from analog sound to digital sound. The more bits that is used in the digital file, the more “steps” there are between the numbers that represent the sound wave. When you reduce the number of bits, the steps between digital numbers become more extensive.
How dither stops noise in exported audio
The energy in the sound that falls between these steps is known as quantization error. If not managed proper, quantization error will become audible as low-level distortion in your file. Dither works to manage quantization error by adding a small amount of random noise to your audio file prior to bit-depth reduction.
The noise is small enough in level that most listener will not hear it, but it is loud enough to ensure that quantization error is transformed to a steady hiss that is easily recognizable and not musical correlated. The calculator will provide mathematical results after you enter the depth of your source file, the depth of your target file, the length of your sample file, your loudness target, and your dither type. Each of these variable will have an impact upon the relationship between your loudness and the noise floor of your audio file.
The depth of your source file will allow the calculator to determine the theoretical range of your analog recording. The depth of your target file will allow the calculator to determine the range that your mastered file will have. The difference between these two depths is the amount of information in your file that the bit-depth reduction process will discard.
Dither is used to manage this information that is discarded during bit-depth reduction. The sample rate of your file and the length of your program will allow the calculator to determine the total number of samples within your file. This total sample count will allow you to determine whether the dither noise will accumulate within your file over time, or whether it will remain negligible.
Information about loudness and peak value is also important in this formula for the same reasons that the other parameters is important. If your mastered file has a high level of integrated loudness, there will be less room between your master and the noise floor created with dither. This noise floor will be visible in the calculator so that you can determine whether the dither that you plan to use will remain within safe listening parameters.
Loudness targets can also be used to decide whether you need to decrease the loudness of your master prior to applying dither. Bright mixes contain energy within the higher frequencies of your master file. This energy may cause additional noise within these high frequencies if you use aggressive noise shaping with your dither.
Spoken word master or masters with acoustic instruments contain less energy within the higher frequencies so they can stand up to more noise shaping. Prior to bit-depth reduction, leave your mastered file at its original high bit-depth resolution. Completing limiting, fades, sample-rate conversion and all gain processing must be completed prior to the application of dither.
By inserting dither before these processes are completed, you may introduce noise into your file that later getting “disturbed” by these processes. Any noise that is introduced into your mastered file prior to dither will be transformed into distortion when these later processes are performed. When your file is reduced to sixteen bit with dither, you should not process that file again at its sixteen bit resolution.
Should you perform any additional processing on that sixteen bit file, the benefits of the dither will no longer be applied to your mastered track. There are various types of dither that you can use that will create difference in the level of noise that you add to your master. Rectangular dither will add the least amount of noise to your file.
Triangular probability density function dither is a very common type of dither that is used for mastering music. High-pass versions of the triangular probability density function dither will raise the noise floor of your mastered track by a modest amount but allow your midrange frequencies to remain cleanly. Other types of dither push the noise energy into the ultrasonic frequencies.
This can be useful for lowering the level of noise in your audible range, but only if your mastered track can stand up to the additional brightness that will be introduced. Each type of dither has its use but is not a universal solution. The best dither for your mastered file will depend upon the type of file and its intended format.
The reference table within this calculator provide information about various targets for mastered files. Targets for sixteen-bit files are common targets for masters that are to be delivered to compact disc or streaming services. Twenty-four-bit files provide enough headroom in the sound processing environment that the application of dither is less important.
However, the principle of dithering still apply to masters that are mastered at twenty-four bits. Floating-point files do not require the application of dither because they have enough headroom in their bit-depth to avoid truncation error. For many mastering engineer, dither is treated as an afterthought in the mastering process due to the quiet nature of the noise that it will add to mastered files.
By treating dither as an afterthought, engineers recreate the problem that dither is meant to solve. Files may sound good when they are first exported from the mastering environment but may reveal noise error if any mastered file is played at high volumes. Mastering engineers pay careful consideration to dither because the difference in sound quality between masters that are dithered versus those that are not is so great that it is immediately noticeable by listener.
The calculator will allow you to see the results of bit-depth reduction before you apply the process to your mastered file. You can use the calculator to determine the effect that different type of dither have upon your mastered file. You can also use the calculator to determine how various length of programs will affect the sound of your mastered files.
The numbers within this calculator will reveal relationships between loudness, noise floor and dither type. By becoming familiar and understanding the impact of dithering your mastered files, you can use your ear to make decisions about mastered files in addition to applying the mathematical calculation of the calculator. Your mastered files should reach the listener with the least possible change from the original master file created during the recording of the audio.
Dither is the process that prevents quantization error from changing the mastered file during the last possible moment.