dB to Percent Calculator
Convert decibel gain or loss into percent of power, voltage, amplitude, sound pressure, or perceived loudness for practical audio level decisions.
🎧Quick Presets
🎚Decibel Percent Inputs
📊dB Percent Spec Grid
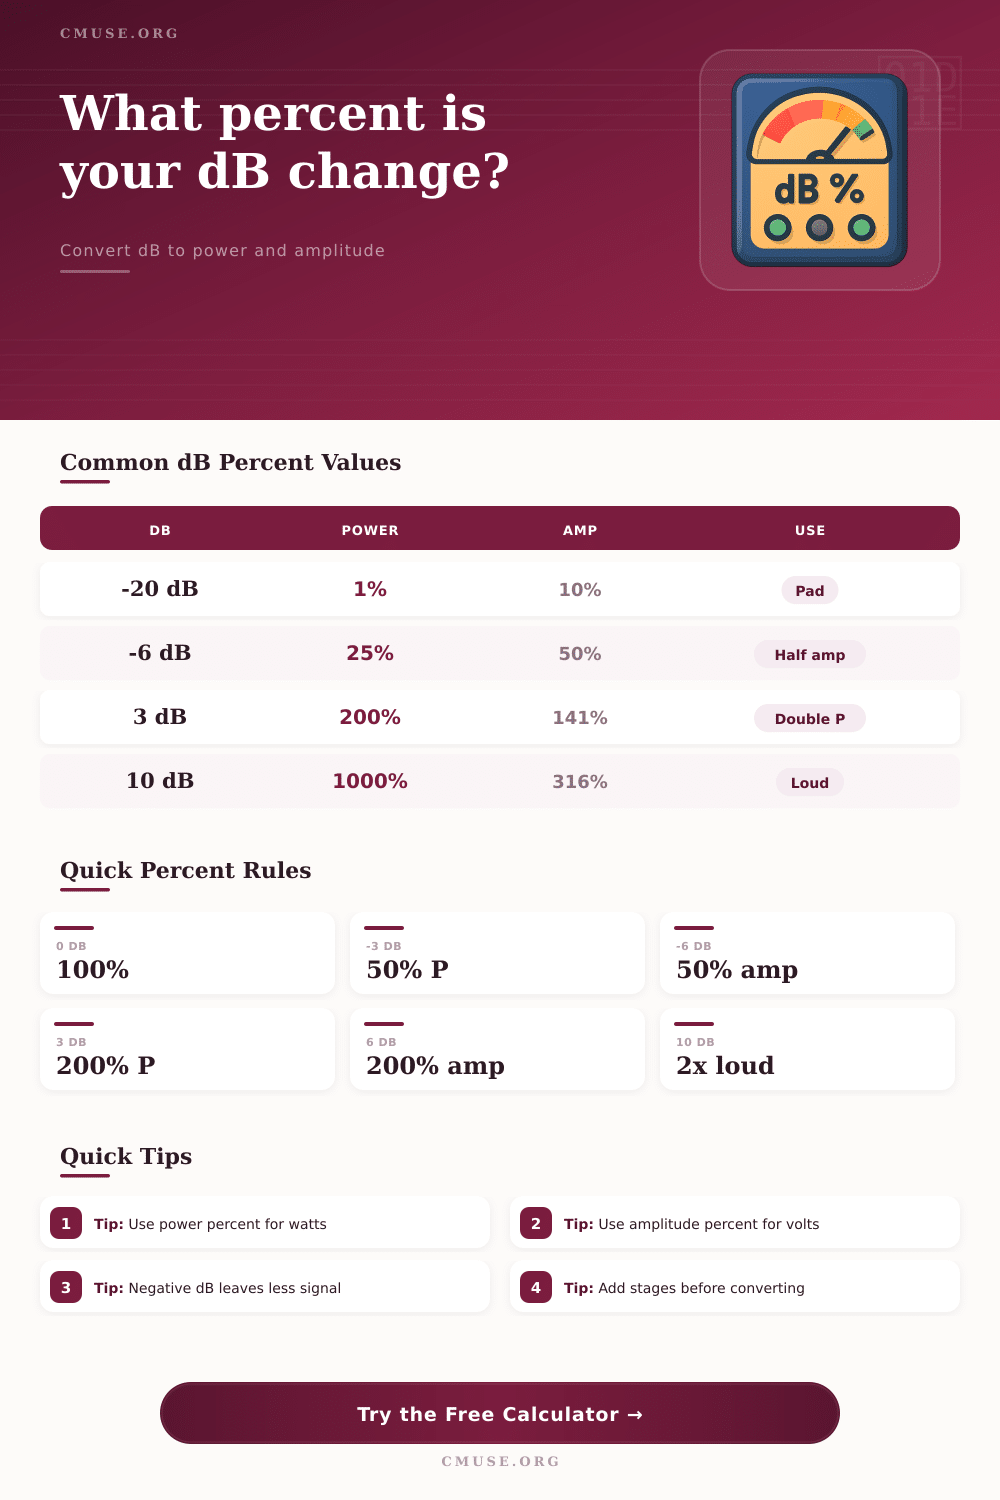
📚Common dB to Percent Values
| dB Change | Power Percent | Amplitude Percent | Typical Audio Meaning |
|---|---|---|---|
| -40 dB | 0.01% | 1.00% | Deep noise or gate reduction |
| -20 dB | 1.00% | 10.00% | Strong pad or attenuation |
| -10 dB | 10.00% | 31.62% | Noticeable level drop |
| -6.02 dB | 25.00% | 50.00% | Half voltage or amplitude |
| -3.01 dB | 50.00% | 70.71% | Half power point |
| 0 dB | 100.00% | 100.00% | No level change |
| 3.01 dB | 200.00% | 141.42% | Double power |
| 6.02 dB | 400.00% | 200.00% | Double amplitude |
| 10 dB | 1000.00% | 316.23% | About twice perceived loudness |
🔊Which Percent Basis To Use
| Basis | Formula | Use For | Percent Interpretation |
|---|---|---|---|
| Power / intensity | 10^(dB / 10) x 100 | Watts, acoustic intensity, amplifier power | Percent of original power |
| Voltage / amplitude | 10^(dB / 20) x 100 | Line level, fader gain, plugin trims | Percent of original amplitude |
| Sound pressure | 10^(dB / 20) x 100 | SPL pressure ratios, microphone pressure | Percent of pressure amplitude |
| Perceived loudness | 2^(dB / 10) x 100 | Rough listening comparison | Approximate subjective percent |
🎛Audio Level Planning Examples
| Scenario | dB Move | Best Basis | Percent Result |
|---|---|---|---|
| Lower a vocal fader | -2 dB | Amplitude | 79.43% amplitude |
| Leave master headroom | -6 dB | Amplitude | 50.12% amplitude |
| Double amplifier power | +3.01 dB | Power | 200.00% power |
| Cut room noise | -10 dB | Power | 10.00% intensity |
| Raise monitor SPL | +10 dB | Loudness | 200.00% approx loudness |
| Plugin makeup gain | +4 dB | Amplitude | 158.49% amplitude |
🧮Target Percent Back-Conversion
| Target Percent | Power dB | Amplitude dB | Use Case |
|---|---|---|---|
| 10% | -10.00 dB | -20.00 dB | Heavy attenuation or cleanup |
| 25% | -6.02 dB | -12.04 dB | Quarter power planning |
| 50% | -3.01 dB | -6.02 dB | Half power or half amplitude |
| 100% | 0.00 dB | 0.00 dB | Unity reference |
| 200% | 3.01 dB | 6.02 dB | Doubling reference |
| 400% | 6.02 dB | 12.04 dB | Four times reference |
💡Practical Tips
When you adjust a fader or when you adds a trim, it is rarely immediately obvious what the result of that adjustment will be. The number on the fader or the trim do not represent a simple percentage of the signal. For instance, a six-decibel cut does not leave you with sixty percent of the signal.
Instead, a six-decibel cut leaves you with half of the amplitude of the signal (the voltage) and a quarter of the power of the signal (the energy). Understanding the difference between amplitude and power will become important in situations such as multiple stage processing, or when you are targeting a loudness value for your mix. A tool that can help to convert between these two representations will be of use to engineers and producers who seeks to understand such relationships between these two values.
How decibels change signal strength and power
Decibels is a measurement of ratios. They are not a unit of measurement for absolute amounts. When working with decibels, it is important to understand whether the calculation that is being performed represents the change in amplitude or the change in power.
Since power is related to the square of the voltage, a simple decibel measurement can create two different percentages, depending on the context of the measurement. Using this decibel converter, a user can select the basis for the measurement that is being made. For instance, if the parameter for which the loudness is being measured is amplifier wattage, or if it is the loudness of sound that is radiating from the speaker in three dimension (power), then that power column will provide the engineer with the appropriate percentage.
However, if a plugin is trimming the loudness of a signal, or if the fader reduces the level of the signal, the measurement of amplitude will be better for the engineer. The mode selector at the top of the tool is important for describing the way in which the parameter is to be changed. Some processing equipment only allows for the addition of gain to the signal (positively valued decibels).
Other processing equipment may only allow for the reduction of the signal (loss in the signal in decibels). By selecting whether the parameter will gain or lose strength, the software can adjust for the changes in the signal accordingly. Each of the stage fields allow for individual adjustments to be entered.
The software will sum these after all adjustments are entered, so that the engineer dont have to remember the total gain or loss that each stage will introduce into the signal. Amplitude is the setting that many engineers will default to when performing their work in the studio. Most engineering work occur with voltages and consoles.
However, power is a measurement that will be more directly related to speaker design, or to the treatment of rooms in which the sound is to be played. For example, cutting ten decibel of noise floor will result in a ten-percent power level, but it will result in a thirty-percent reduction in amplitude. Each of these values has different implications for mastering and mixing decisions, such as the setting of a gate for a vocal track.
The tables located on the page allow engineers to quickly understand these differences at various decibel levels. Perceived loudness is one of the factors that is different from the mathematical calculations of loudness. A ten decibel increase in loudness is often described as being a factor of two in loudness to the human ear, though this is only approximate.
The loudness basis allows engineers to model this factor of two relationship in their mixing and mastering decisions. However, it is still only a planning aid to the mixing engineer, and not a replacement for actually playing the mastered material at the target loudness level. Another field that many engineers may tend to overlook is the starting level field.
It is easy to ignore this field, but engineers can also misuse it who may be attempting to make certain that their adjustments are based off the physical signal that is being created within the mixing session. For instance, if a signal is already at eighty percent of the total signal, a six decibel cut will not reduce it to fifty percent of the original signal. Rather, it will reduce it to forty percent.
The software calculates the starting level after each decibel value is adjusted. This is important to know if, for instance, certain stems is already attenuated prior to being mixed with other elements. The field that many engineers may be most familiar with is the target output field.
This field is often used last when making adjustments. By entering the desired output of a parameter, the software can calculate the number of decibels that must be moved to that parameter to achieve the desired result. This parameter is especially useful after a session is complete and balanced, but when mastering decisions must be made as to the loudness of individual elements.
For instance, if a vocal track is meant to be seventy-five percent of the loudness of the current vocal element, the software can calculate the trim that should of be made to the vocal to achieve that level. Understanding the difference between power and amplitude is crucial in understanding both of these values and units of measurement. For instance, to double the power of a signal, only three decibels are required.
However, to double the amplitude of a signal, six decibels are required. Thus, a three decibel change is likely to have a noticeable effect on the acoustic output of the signal, but a six decibel change is required to double the voltage of the signal. Thus, it is important for engineers to understand these relationships to avoid making mistakes, such as treating each three decibel change as if it is the same in strength.
In most mixing sessions, there will be more than one adjustment that must be made to the levels of elements within a song. For instance, a compressor may add two decibels of gain, a fader may be used to adjust the level of a track by three decibels, and another mixing or mastering plugin may make another adjustment that adds another four decibels. Thus, the total gain or loss will determine the percentage of each element in the song.
The fields for individual stages allow engineers to model these changes within the software, instead of having to use the decibel calculator for each individual adjustment. Once the total change is calculated, engineers can determine whether the changes are acceptable, or whether some adjustments must be made elsewhere in the song. In using this decibel calculator in mastering sessions, engineers will have a better understanding of the difference between decibels and percentages.
When a certain amount of headroom is required for a mix, for instance, it will be immediately understood that cutting six decibels will halve the amplitude of the signal and quarter the power of the signal. Engineers will then be able to make certain that the remainder of the signal chain is adjusted accordingly.