Ceiling Speaker Placement Calculator
Estimate coverage diameter, speaker quantity, row spacing, and edge offsets from room dimensions, ceiling height, listener height, and speaker dispersion angle.
🎧 Named Room Presets
⚙ Room, Ceiling, and Speaker Inputs
Ceiling Grid Preview
📊 Speaker Coverage Spec Grid
🔍 Coverage Profile Comparison
Narrow Coaxial
Balanced In-Ceiling
Wide Distributed
Ambient Coverage
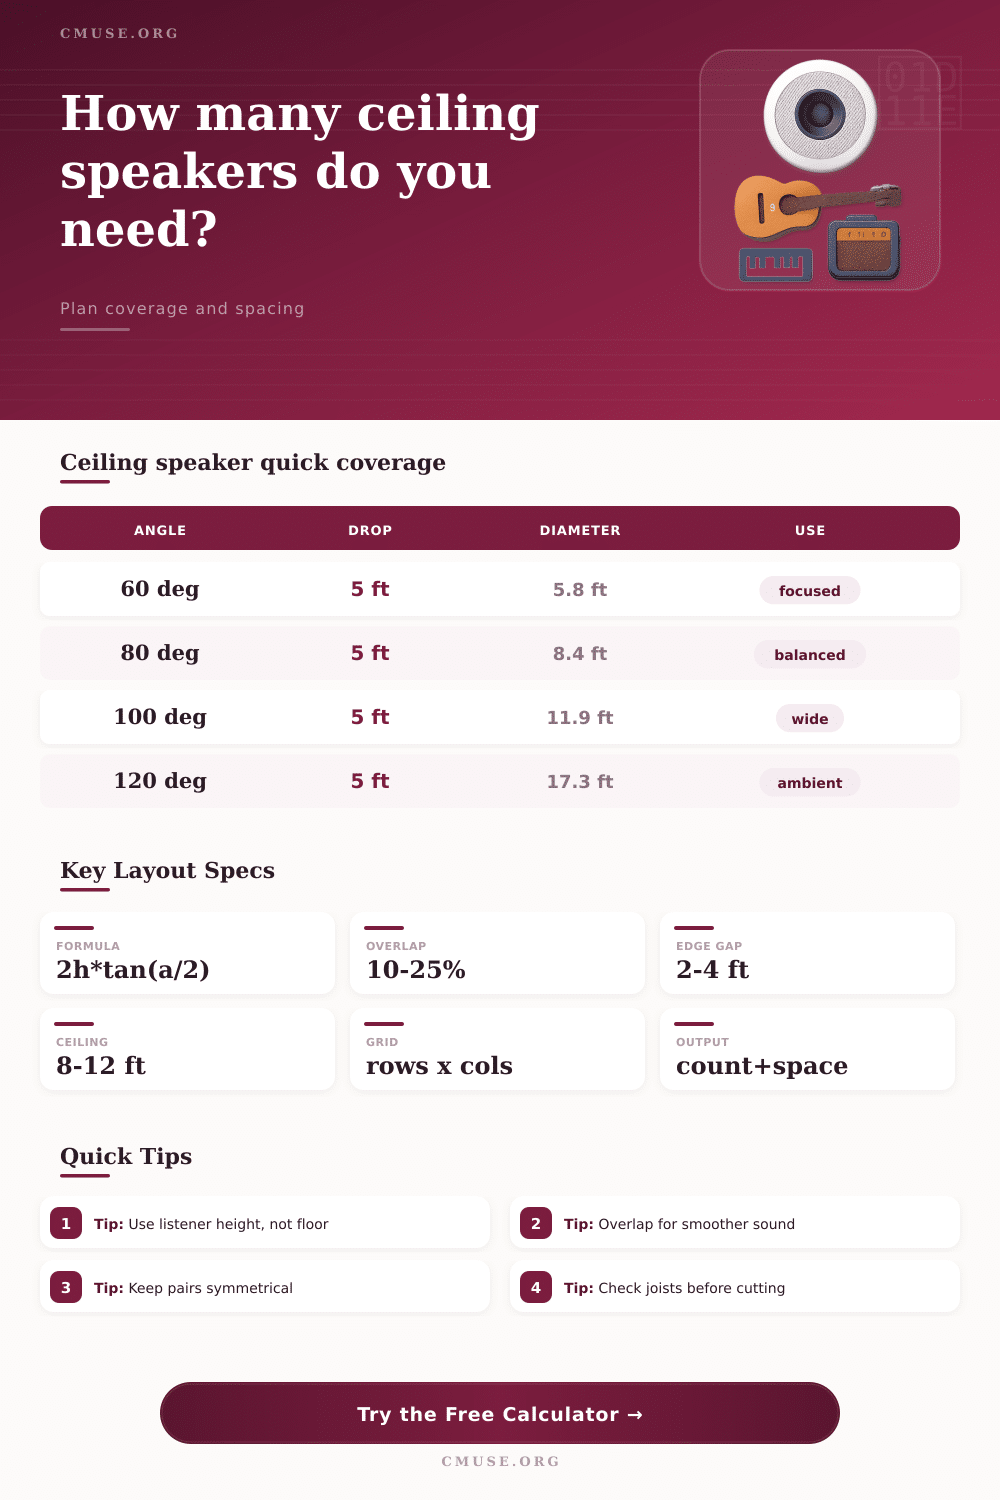
📐 Dispersion to Coverage Reference
| Dispersion Angle | Ceiling-to-Ear Drop | Coverage Diameter Formula | Layout Note |
|---|---|---|---|
| 60 deg | 5 ft / 1.52 m | 5.8 ft / 1.76 m | Focused cone, more speakers |
| 80 deg | 5 ft / 1.52 m | 8.4 ft / 2.56 m | Common music and media rooms |
| 100 deg | 5 ft / 1.52 m | 11.9 ft / 3.63 m | Wide background coverage |
| 120 deg | 5 ft / 1.52 m | 17.3 ft / 5.28 m | Ambient fill, less focused imaging |
| Room Type | Suggested Overlap | Edge Clearance | Placement Priority |
|---|---|---|---|
| Home studio | 15% to 25% | 2 to 3 ft / 0.6 to 0.9 m | Symmetry around mix position |
| Practice room | 10% to 20% | 2 ft / 0.6 m | Even rehearsal coverage |
| Music classroom | 20% to 30% | 3 to 4 ft / 0.9 to 1.2 m | Speech clarity plus music playback |
| Venue lobby | 5% to 15% | 4 to 6 ft / 1.2 to 1.8 m | Background level consistency |
| Common Project Size | Dimensions | Typical Count | Speaker Profile |
|---|---|---|---|
| DJ booth | 6 x 4 ft / 1.8 x 1.2 m | 1 to 2 | 80 deg balanced |
| Recording booth | 5 x 5 ft / 1.5 x 1.5 m | 1 | 100 deg low level fill |
| Media room | 15 x 20 ft / 4.6 x 6.1 m | 4 to 6 | 80 deg music coverage |
| Classroom | 24 x 30 ft / 7.3 x 9.1 m | 9 to 12 | 80 to 100 deg distributed |
| Specification | Why It Matters | Conservative Range | Calculator Input |
|---|---|---|---|
| Dispersion angle | Defines the usable cone width | 60 to 120 deg | Speaker dispersion angle |
| Listener plane drop | More height creates larger coverage | 4 to 8 ft / 1.2 to 2.4 m | Ceiling height minus ear height |
| Overlap target | Smooths level dips between speakers | 10% to 25% | Coverage overlap target |
| Edge clearance | Keeps first speaker away from wall buildup | 2 to 6 ft / 0.6 to 1.8 m | Wall edge clearance |
Ceiling speakers is used to play sound in a room without using floor stands or wall boxes. Ceiling speakers create sound from above the room, and the placement of these speakers determine the evenness of the sound that the listeners in the room will hear. If you place ceiling speakers in the incorrect spots in the room, this will create hot spots and dead zones in the room.
Furthermore, you may also end up buying too many ceiling speakers because the coverage cones will not reach all of the spots in the room where people will be sitting. The vertical distance from the finished ceiling to the ear height of the listener is one of the main variables that will determine where you place your ceiling speakers. If you consider the vertical distance from the ceiling to the ear height of the listener and the dispersion angle of the speakers, you can calculate the diameter of the coverage cones that the ceiling speakers will create.
How to Place Ceiling Speakers
The wider the dispersion angle of the ceiling speakers, the more soundly that will fill the room. However, the dispersion angle will lower the sound intensity that comes out of the edges of the coverage cones. This reduces the real area that will be covered by the ceiling speakers.
A calculator can perform this calculation for you to save you from having to calculate the dispersion angle yourself. Another decision that you have to make with the placement of your ceiling speakers is the overlap of the coverage cones. The speakers can be arranged in a way that has zero overlap between the coverage cones of each speaker, but you may find that the sound between the speakers will become thin.
A modest amount of overlap between coverage cones will help to even out the sound between each speaker, and it will reduce the number of dips in sound volume. Furthermore, if there is a modest amount of overlap, people will experience a more consistant sound level throughout the house. However, if there is too much overlap in the coverage cones of each speaker, you are wasting both your ceiling speakers and your money.
The requirement of overlap between coverage cones will depend on the use of the room. If the room will be used for speech, overlap is not as important as warmth in the sound. However, for music, overlap is more important because it will create a believable stereo image for the listener.
Similar to the overlap of the coverage cones of the ceiling speakers, there is a rule for the placement of the outermost ceiling speakers relative to the walls in the room. If you place the speakers too close to the walls, the reflections off the walls will make the sound muddy in the room. Therefore, there must be a buffer zone between the ceiling speakers and the walls.
The calculator can determine where to place these speakers to provide for a buffer zone around the perimeter of the speakers. In rectangular rooms, the dispersion angles can be calculated based on the rectangular shape of the room. However, if the area where people will be listening will be circular, you must arrange the placement of the speakers in a radial pattern to evenly project sound into the listening area.
Furthermore, if there are triangular zones or other irregularly shaped areas in the room, the calculations will have to be made with the dispersion angles and the required edge clearance for each area. The calculator can automatically recalculate the placement of the speakers if you change the shape of the room. In any room, the ear height of the listeners is a factor in the placement of the ceiling speakers.
If the room will contain people who will be sitting on low couches (such as a media room), the distance that the sound will travel will be different than a room where people will be standing (such as a bar or lobby. Furthermore, if you use the height from the floor to the ceiling instead of the height from the ceiling to the ears of the listeners, you will overestimate the diameter of the coverage cones of the ceiling speakers. Using too great of a coverage diameter will cause you to use too few ceiling speakers.
Therefore, the speaker placement software will ask for the height of the listeners’ ears so that you dont make this mistake in your shopping for ceiling speakers. In real rooms, there are physical constraints that a speaker placement calculator will not be able to see. For instance, there may be joists, lights, or other features in the ceiling that will make it impossible to place a speaker in one of the spots that the software calculated.
You must make adjustments to the placement of the speakers on site using a stud finder and flashlight. Furthermore, you must make sure that the placement of the speakers is symmetrical relative to the main listening spot in the room because the human ear will detect any imbalance between the left and right speakers more quickly than it will note any change in the spacing between any other speakers. Furthermore, the dispersion angle of the ceiling speakers impacts where the speakers are placed and the use of the room.
For instance, if the dispersion angle of the speakers is narrow, the sound will be less likely to splash against the walls, ceilings, or other objects in the room. This works well for rooms where speech is the main function of the speakers. However, if the dispersion angle of the speakers is wide, there will be fewer ceiling speakers needed to provide background sound for the rooms.
However, this is detrimental for music listening if the goal is to provide a believable stereo image that is projected evenly into the listening area. The dispersion angle selector in the speaker placement software allows you to choose between the different dispersion angles and the overlap between coverage cones of the speakers so that you can easily see how many speakers you will need for each setting. The final number of ceiling speakers that the software calculates is just an example of the number of speakers that may be needed for your room.
Furthermore, you may need to add or remove a row of ceiling speakers based off your budget or the number of channels that your amplifier has. However, if you add or remove a row of speakers, you must recalculate the placement of the speakers in the room to make sure that there are no dead spots. Furthermore, the speaker placement software allows you to view a map of the placement of each row and each column of speakers.
This will allow you to make sure that the speakers will fit onto your ceiling in the physical room. If you think of each of these factors and decide on the placement of each type of speaker before you purchase the equipment for your ceiling speakers, you will have prevented two common mistakes. The first is purchasing too many ceiling speakers to fill the room yet still having dead spots in the room.
The second is purchasing too few ceiling speakers to even cover the area of the rooms where people will be listening to the music. However, in the end, the best way to fine-tune the placement of the speakers would of been to walk through the rooms with music playing to adjust for the factors that the software could not calculate.