Acoustic Panel Placement Calculator
Estimate panel count, first-reflection points, room coverage, and RT60 change from real room geometry.
🎛Fast Room Presets
📏Room Geometry And Panel Inputs
🔊Selected Material Spec Grid
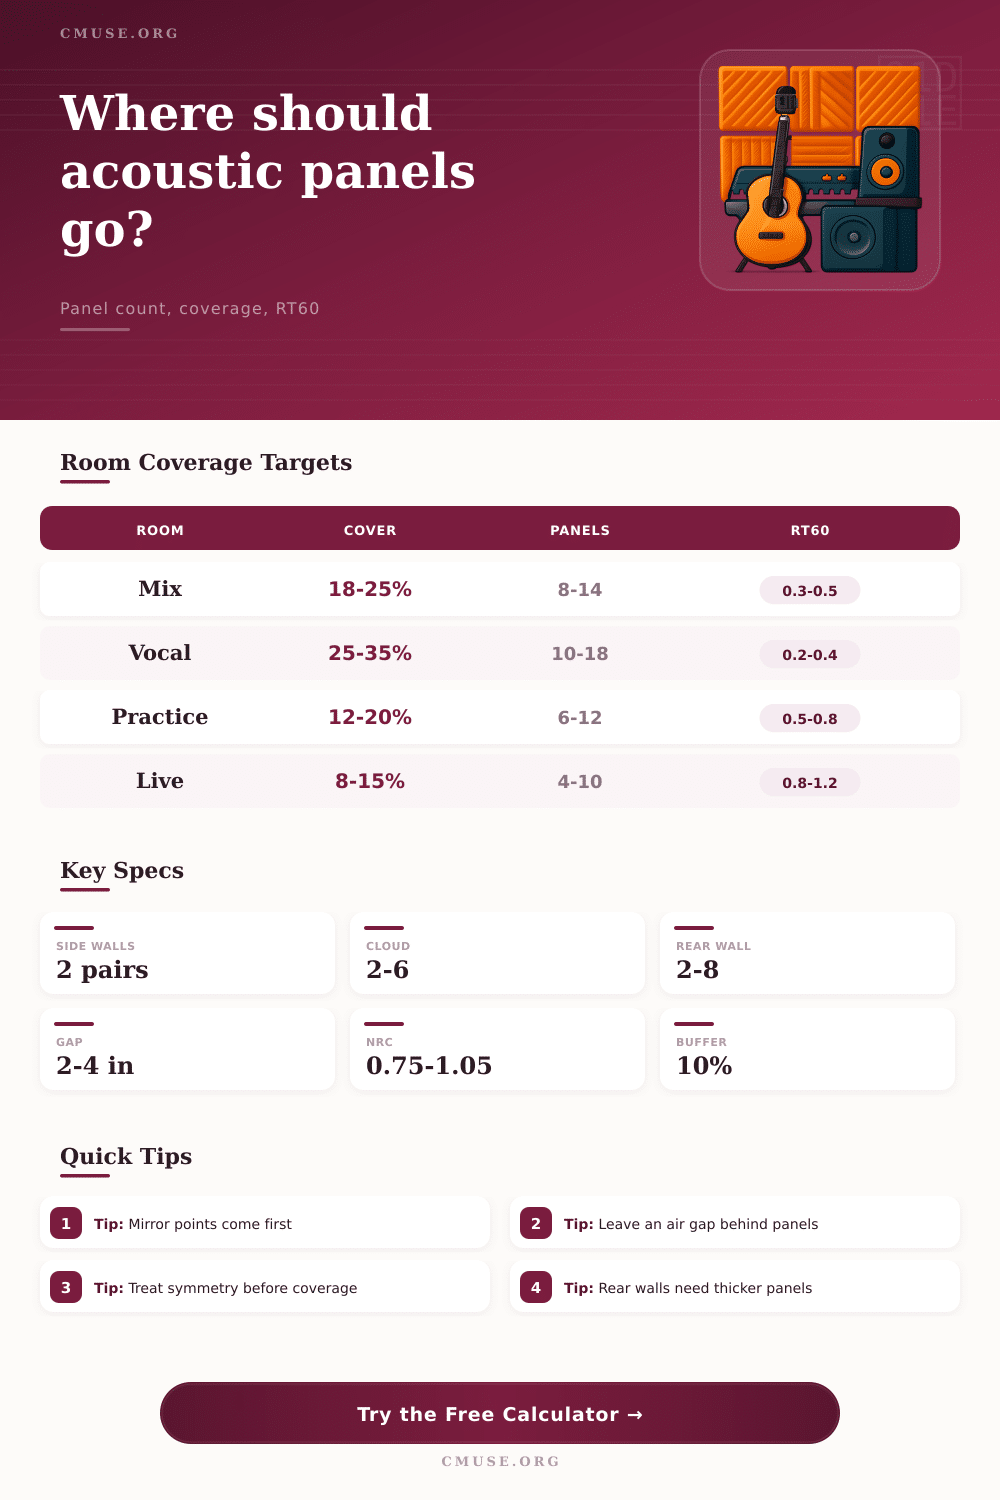
📊Coverage Targets By Room Use
| Room use | Target coverage | Typical RT60 goal | Placement emphasis |
|---|---|---|---|
| Mixing / mastering | 18% to 25% | 0.30 to 0.50 s | Symmetric side walls, ceiling cloud, rear wall |
| Vocal recording | 25% to 35% | 0.20 to 0.40 s | Early reflections, rear wall, portable corner control |
| Practice room | 12% to 20% | 0.50 to 0.80 s | First reflections, loud instrument wall, ceiling splash |
| Drums / loud source | 22% to 35% | 0.35 to 0.60 s | Ceiling, corners, wall behind kit, rear wall |
| Speech / podcast | 20% to 30% | 0.20 to 0.35 s | Desk reflections, speaker wall, rear wall, ceiling |
| Live room | 8% to 15% | 0.80 to 1.20 s | Flutter-echo paths without over-deadening the room |
📍Placement Priority Table
| Surface | Geometry formula | Panel allocation | Why it matters |
|---|---|---|---|
| Side walls | Mirror point between speaker and listener | 2 to 4 panels | Controls stereo image blur and comb filtering |
| Ceiling cloud | Ceiling mirror point over mix triangle | 2 to 6 panels | Reduces desk and ceiling bounce at the listening spot |
| Front wall | Behind speakers, centered by speaker spread | 2 to 6 panels | Helps speaker-boundary reflections and front slap |
| Rear wall | Behind listener, wider than head zone | 2 to 8 panels | Reduces late slapback and flutter behind the seat |
| Corners | Thick panels straddling wall intersections | 2 to 8 panels | Adds low-frequency damping when panels are deep enough |
🧱Panel Material Comparison
| Absorber type | NRC range | Low-frequency behavior | Best placement |
|---|---|---|---|
| Rigid fiberglass, 2 in | 0.80 to 0.90 | Light below 250 Hz | Side reflections and speech rooms |
| Rigid fiberglass, 4 in | 0.95 to 1.05 | Useful into lower mids with gap | Broadband first reflections and rear wall |
| Mineral wool, 3 in | 0.85 to 0.95 | Balanced midrange control | Practice rooms and vocal booths |
| Polyester fiber, 2 in | 0.65 to 0.80 | Gentler low-mid absorption | Light treatment and portable panels |
| Perforated wood absorber | 0.55 to 0.75 | Depends on cavity depth | Live rooms needing controlled brightness |
| Thick broadband panel | 0.95 to 1.10 | Best option for rear wall and corners | Control rooms, drums, bass-heavy rooms |
🏚Common Room Size Reference
| Room | Dimensions | Starting panel count | Typical placement plan |
|---|---|---|---|
| Small booth | 5×5×8 ft | 8 to 12 | Four walls plus overhead cloud |
| Bedroom studio | 10×12×8 ft | 10 to 14 | Side pair, cloud, front wall, rear wall |
| Project control room | 16×20×9 ft | 18 to 28 | Wide cloud, side zones, rear wall, corners |
| Practice room | 12×14×8 ft | 10 to 18 | Loud wall, ceiling, flutter-echo pairs |
| Live tracking room | 18×24×10 ft | 16 to 30 | Distributed panels with reflective spaces left open |
💡Placement Notes
Acoustic treatment involve understanding how sound travels in a treated room. The effectiveness of acoustic treatment is dependent on the placement of the panels rather than an total amount of acoustic treatment that is purchased. Most people who begins treating their rooms with acoustic treatment panels purchase much panels and begin to place the panels on the walls according to their visual preference.
However, using visual preference to place acoustic treatment panels often create problems with the sound reproduction in that treatment room, especially with the low-midrange frequencies and vocal recordings in the room. Thus, focusing upon the placement of the acoustic treatment panels will best provide the effectiveness of acoustic treatment. Every room has specific area in which sound reflects from the speakers in the room to the ears of the listeners after only one reflection of that sound wave.
Where to Put Acoustic Panels for Better Sound
These areas is more important then the remainder of the walls in the room. Placing acoustic treatment panels on these first reflection point on the side walls and the ceiling will solve many of the imaging problems that may exist in the room. The remainder of the room may stay relatively live when acoustic treatment is applied to those first reflection points.
The thickness of the acoustic treatment panels and the air gap that is created behind the panels will determine the absorption of the sound wave that enter the room. A three-inch acoustic panel that is mounted directly against drywall will not absorb low midrange frequencies as effective as a three-inch acoustic panel with a two-inch air gap behind the panels. Using the acoustic treatment calculator will allow you to enter the dimension of your room and the specifications of the acoustic panels that you are considering for your room to view how much sound energy your treatment will absorb.
The amount of acoustic treatment that a room require will vary based off the way in which you plan to use that room. Rooms that is used for mixing require acoustic treatment and absorption, but do not need to be completely dead. Rooms that are used as vocal booth require more acoustic treatment than other types of rooms.
Rooms used for practice and live tracking require a medium amount of acoustic treatment. Using too little acoustic treatment will cause the room to ring, but using too much treatment will make the instrument lose their natural sound. The page provides a reference table to show the amount of acoustic treatment that is required for each type of room.
The material for the acoustic treatment panels is another factor to consider in the treatment of a room. Rigid fiberglass will absorb the most sound energy and is recommended for the placement at the first reflection points. Mineral wool work in the same way as the fiberglass panels, but may feel different when installing the panels.
Polyester panels are safer for high frequencies and easier to move when experimenting with placement. Perforated wood absorbs less energy then other materials, but will provide a brighter remaining sound to the listeners in the treated room. You can use the acoustic treatment calculator to experiment with different material and how the treatment of the room will change.
Symmetry is one of the requirements for acoustic treatment that is more important than the total amount of acoustic treatment. Placing treatment on only one side wall but not the other may lead to shifting image from the speakers. Treatment of the rear wall will reduce the “slap” that occurs after the sound is played, but it is necessary that the treatment is wider than the listening position to provide the same experience to each ear.
It is also necessary to place thicker panels in the corners to reflect low frequencies. Most real rooms are far from perfect rectangle with no doors, windows or furnitures. Placing a large window on one of the side walls will reflect less sound than the other side walls that do not have any windows.
The same is true for a closet that contains many clothes. While the acoustic treatment calculator can show you how much sound will be reflected in the room, you will have to place the acoustic treatment panels and listen to the room to determine if you need to move any of the panels. Budget is one of the factor that will impact your decision in selecting the acoustic treatment panels.
Purchasing twelve high-quality panels and placing them in the correct spots in the room is better than purchasing twenty average panels for the same job. The acoustic treatment panel calculator builds in a buffer for overages in the acoustic treatment plan so that you will not run out of acoustic treatment panels. The goal for acoustic treatment is not having to find the perfect number when you begin the treatment of your room.
Rather, the goal is to understand what type of treatment will work best for the various room in your home. The acoustic treatment panel calculator is a helpful tool for this understanding. However, you’ll still have to sit in the listening position to determine what the best treatment is for your treatment room.