Louden Ratio Calculator
Calculate studio room dimensions from Louden ratios, compare an existing room, and estimate first axial modes for practical acoustic planning.
🎚 Quick Studio Presets
📏 Room Ratio Inputs
🎵 Ratio Spec Grid
📊 Ratio Comparison Table
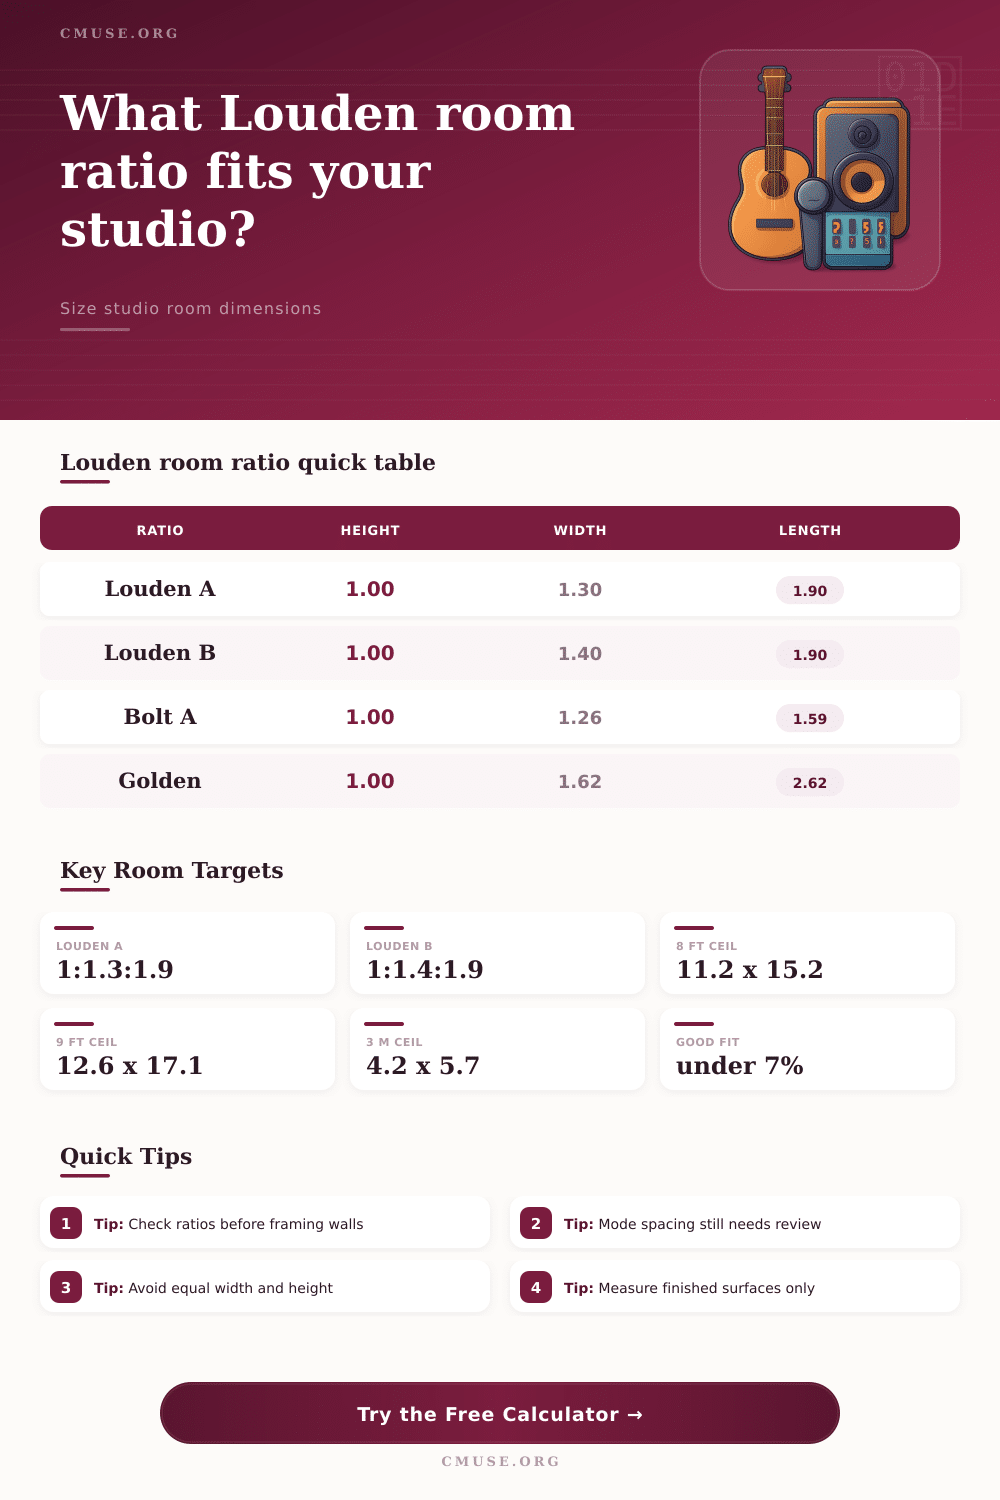
| Ratio Name | Height : Width : Length | Best Use | Planning Note |
|---|---|---|---|
| Louden B | 1 : 1.40 : 1.90 | Control rooms | Balanced width and length spread |
| Louden A | 1 : 1.30 : 1.90 | Narrow rooms | Keeps length while reducing width |
| Bolt A | 1 : 1.26 : 1.59 | Compact studios | Useful when length is limited |
| Sepmeyer | 1 : 1.14 : 1.39 | Small rooms | Shorter footprint with tighter modes |
| Walker | 1 : 1.19 : 1.40 | Broadcast rooms | Often used for modest control spaces |
| Golden | 1 : 1.62 : 2.62 | Large rooms | Needs much more length per height |
📐 Louden Height Target Table
| Ceiling Height | Louden A Width x Length | Louden B Width x Length | Louden B Volume |
|---|---|---|---|
| 7.5 ft / 2.29 m | 9.75 x 14.25 ft | 10.50 x 14.25 ft | 1122 cu ft / 31.8 m3 |
| 8 ft / 2.44 m | 10.40 x 15.20 ft | 11.20 x 15.20 ft | 1362 cu ft / 38.6 m3 |
| 9 ft / 2.74 m | 11.70 x 17.10 ft | 12.60 x 17.10 ft | 1939 cu ft / 54.9 m3 |
| 10 ft / 3.05 m | 13.00 x 19.00 ft | 14.00 x 19.00 ft | 2660 cu ft / 75.3 m3 |
| 12 ft / 3.66 m | 15.60 x 22.80 ft | 16.80 x 22.80 ft | 4596 cu ft / 130.2 m3 |
🔊 First Axial Mode Examples
| Room Target | Height Mode | Width Mode | Length Mode |
|---|---|---|---|
| Louden B 8 ft | 70.6 Hz | 50.4 Hz | 37.2 Hz |
| Louden B 9 ft | 62.8 Hz | 44.8 Hz | 33.0 Hz |
| Louden B 10 ft | 56.5 Hz | 40.4 Hz | 29.7 Hz |
| Louden A 8.5 ft | 66.5 Hz | 51.1 Hz | 35.0 Hz |
| Bolt A 8 ft | 70.6 Hz | 56.0 Hz | 44.4 Hz |
✅ Match Tolerance Guide
| Average Ratio Error | Fit Label | Dimension Check | What It Means |
|---|---|---|---|
| 0% to 3% | Excellent | Usually within trim tolerance | Very close to the selected target ratio |
| 3% to 7% | Good | Often workable | Small acoustic differences remain possible |
| 7% to 12% | Moderate | Check layout carefully | Room treatment and placement matter more |
| Over 12% | Revisit | May need resizing | Ratio is far from the chosen target |
Dimensions in a recording studio are important for creating an area that will produce even sounding throughout the location. The dimensions that are used for studios include the height of the space, the width of the space, and the length of the space. If the dimension of the room are incorrect, it can cause problems with the sound that is reflected from the walls of the room.
For instance, certain frequency can build up within the room or certain frequencies can dissapears from the room entirely. Furthermore, one can use the Louden ratio to find the target dimension for the recording studio to minimize these problems with sound reflection. Studios can behave as boxes that resonate with low frequency.
How Room Size Affects Studio Sound
These low frequencies within the studio can lead to standing waves that can develop within the recording studio. If the dimensions of the rooms is too similar to one another, the standing waves will tend to develop in the same locations within the studio. These standing waves can create peaks and dips in the sound that is created by the listening area of the recording studio.
These problems can be minimized by using the Louden ratio to even out these standing waves, especially in the frequency range below 200 Hz. A calculator can be used to determine the dimensions of the recording studio given the ceiling height of the area by plugging the height and the Louden ratio into the calculator. There are different Louden ratio for different types of spaces.
For instance, most spaces use Louden B, as it even spread the modes created by the standing waves of the room. Additionally, Louden A is used for spaces that are more smaller in size, as it narrows the space requirements for the width of the room. For spaces that is significantly small, such as small control rooms, Bolt A can be used for the same reason as Louden A. Finally, the golden ratio can also be used for determining the dimensions of the recording studio, though it requires stretching the walls of the studio, which may not be an option for most home studio.
Each of these ratios can be selected using the calculator to determine how each impact the dimensions of the recording studio. By plugging in the actual dimensions of the recording studio into the calculator, it will provide information as to the difference between the actual dimensions and the target dimension of that studio. If the difference between these two set of dimensions is small, the studio will behave in a relatively even manner.
However, if the difference is significant, special consideration need to be given to the speakers and listening position within the studio. Additionally, the significant difference suggests that the studio may require more aggressive acoustic treatment within the corners of the listening area. The tolerance for deviation from the target dimension can be altered in the calculator so that the dimensions of the room are ensured to fall within an acceptable range.
Furthermore, account for the thickness of the drywall, isolation clip, and the floor build-up since these dimensions will impact the sound that is reflected from the walls of the recording studio. The temperature of the recording studio is another factor that must be considered when plugging into the calculator. Because the speed of sound change with the change in air temperature within the recording studio, the change in the speed of sound will change the frequency of the lowest axial mode within the room by one or two hertz.
Thus, it is important to adjust for the change in the speed of sound so that the target dimensions and frequencies are properly understood prior to the placement of bass trap within the recording studio. These frequencies will allow for the understanding of the problems that exist within the room prior to the placement of bass traps. The ratio of the dimensions of a recording studio is important for establishing the dimensions of the recording studio, but the ratio does not provide a finished design for the recording studio.
It is possible for a recording studio to have perfect dimension and ratios, but still experience acoustic problems within the studio if the speakers is not properly placed within the recording studio. Furthermore, even if the dimensions of the studio are appropriate, the calculator cannot take into account the placement of doors, windows, or furniture within the recording studio. Additionally, the placement of HVAC system within the studio will also impact the dimensions of the studio.
It is likely that many recording studio have discovered these problems after the walls have been built around the room. If the dimensions of the room are measured after the building of the walls, it is likely that the discovery of the deviation from the target dimensions indicates that the installation of the ceiling treatment or the isolation of the floor has altered the dimension of the recording studio. Thus, if the dimension have been altered, there are limited option to remedy the situation.
It is possible to live with the problems caused by the altered dimension, or it is possible to treat the room with low-frequency treatment. However, if the target dimensions are understood prior to the building of the recording studio walls, these problem can be avoided. Furthermore, these strategy can be used for the conversion of an existing recording studio.
In many instance, it may not be possible to alter the height of the ceiling of an existing studio. However, it may be possible to alter the location of the front and rear walls of the existing studio, or to alter the dimensions of the bass trap that are already installed within the walls. Furthermore, by plugging the dimension of the existing recording studio into the calculator, it is possible to determine how close the existing studio may be to a target ratio.
This information can help the studio owner to make decisions regarding the change that may need to be made to the existing studio. Finally, it is important to remember that the Louden ratio is only one variable within the sound creation of a recording studio. Furthermore, the ratio does not eliminate the problem that may exist with poor speaker placement within the studio.
Thus, the ratio is only one of many variable that should be considered within the effort of creating an even sounding environment within the recording studio. However, if the dimensions of a recording studio are set up appropriately from the beginning to provide even sound, the problem associated with acoustic treatment will be avoided.