MIDI Velocity Calculator
Convert MIDI note velocity into normalized amplitude, relative dB, target velocity, and practical dynamic-range values for programmed instruments.
🎹 Performance Presets
🎚 Velocity Inputs
📊 MIDI Velocity Spec Grid
amplitude = velocity / 127,
dBFS = 20 * log10(amplitude),
dB vs ref = 20 * log10(output velocity / reference velocity),
target velocity = reference velocity * 10^(target dB / 20).
🎼 Velocity to Amplitude Reference
| Velocity | Linear Amplitude | dBFS | Energy Index |
|---|---|---|---|
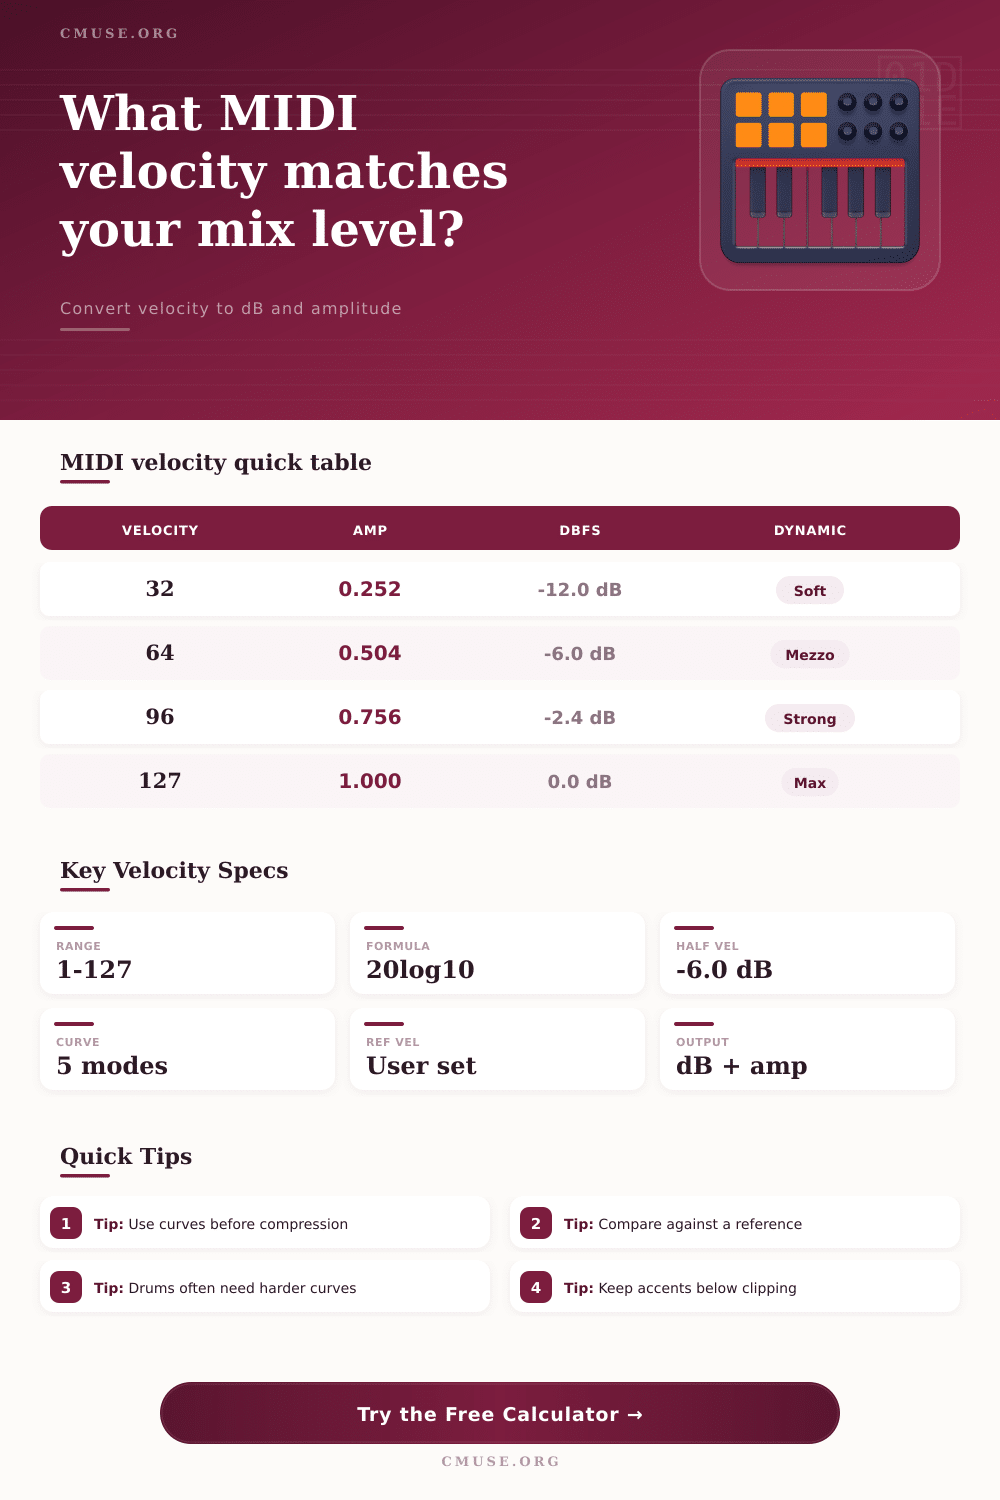
| 16 | 0.126 | -18.0 dB | 1.6% |
| 32 | 0.252 | -12.0 dB | 6.3% |
| 64 | 0.504 | -6.0 dB | 25.4% |
| 96 | 0.756 | -2.4 dB | 57.1% |
| 112 | 0.882 | -1.1 dB | 77.8% |
| 127 | 1.000 | 0.0 dB | 100.0% |
🎵 Dynamic Marking Guide
| Marking | Velocity Range | Typical Use | Approx dBFS |
|---|---|---|---|
| ppp | 1-20 | Ghost notes, very soft layers | -42 to -16 dB |
| p | 21-45 | Soft comping and quiet pads | -16 to -9 dB |
| mp | 46-63 | Understated parts below center | -9 to -6 dB |
| mf | 64-84 | Natural mid-level performance | -6 to -3.6 dB |
| f | 85-105 | Strong notes and drum hits | -3.5 to -1.7 dB |
| ff | 106-127 | Accents, peaks, impacts | -1.6 to 0 dB |
🔀 Curve Comparison Table
| Curve | Formula Shape | Best For | Result Feel |
|---|---|---|---|
| Linear | n | Piano editing, neutral MIDI | Direct and predictable |
| Soft | n^0.65 | Light touch controllers | Louder at lower velocities |
| Hard | n^1.45 | Drum pads, accents | Quieter until struck firmly |
| Log | log lift | Synth pads, expressive swells | Smooth low-end rise |
| Exp | exponential | Brass, impacts, stabs | More dramatic top end |
📝 Common MIDI Programming Targets
| Part | Velocity Target | Reference | Use This Range |
|---|---|---|---|
| Ghost Snare | 22-40 | Backbeat 90 | -12 to -7 dB below |
| Verse Piano | 58-78 | Chorus 90 | -3.8 to -1.2 dB below |
| Kick Accent | 92-116 | Main kick 100 | -0.7 to +1.3 dB |
| String Swell | 35-96 | Peak 96 | -8.8 to 0 dB |
| Synth Lead | 84-112 | Lead peak 112 | -2.5 to 0 dB |
MIDI velocity values determines how a digital instrument responds when a person play a key or a pad on MIDI controllers. MIDI velocity isnt just a representation of loudness but also a signal that tells a sound engine how to change its sound. The sound engine use MIDI velocity to determine how hard a note should be struck, how bright a sample should be, how much a filter should open, and how much a release should ring.
If a person changes the MIDI velocity by twenty points, the MIDI velocity value could change a musical part from a background sound to a foreground musical element. Because MIDI velocity impacts so many aspects of a sound, many music producers spends some time adjusting the MIDI velocity values of their musical parts. To convert MIDI velocity to decibels, a person must use a mathematical procedure.
How MIDI Velocity Changes Sound and Volume
MIDI velocity have a range from one to one hundred twenty-seven. If a person divides a MIDI velocity value by one hundred twenty-seven, the result is a simple amplitude ratio. If a person takes the base ten logarithm of that ratio and multiplies it by twenty, the result is the value of the MIDI velocity in decibels.
Given a source MIDI velocity value, a chosen curve, and a reference point for that velocity, a calculator can perform the mathematical procedure. The reference point is crucial to understanding the results of that calculation. For instance, using a reference point of sixty-four, a MIDI velocity of one hundred twelve will return a result of approximately six decibels louder then the reference point.
This difference in decibels will determine whether that musical part will sit well within the mix or whether it will jump forward in the musical arrangement. Curves is used in the calculation because hardware instruments may feel differently about the same MIDI velocity values than software instruments. For example, if a MIDI controller is a weighted keyboard, the instrument will feel as if the keys react naturaly to the velocity values entered.
However, a lightweight MIDI controller may not feel as if the keys are reacting as strong to those velocity values. A soft curve will make the software patch feel as if it will react to quieter strikes on the keys. A hard curve will make the software patch feel as if it will only react to strong strikes on the keys.
Using a hard curve on a MIDI controller’s snare drum will allow for a ghost note and backbeat to be cleanly separated. The logarithmic and exponential curve options allow for a stretch of the bottom and the top of the MIDI velocity value range. Because no curve choice is better than any other curve choice, a person select the curve according to the MIDI controller that they are using.
A person must decide how to compare the calculated MIDI velocity values of their musical part to the rest of the arrangement. For example, a snare drum hit may have a MIDI velocity value of ninety-six in one part of the arrangement. The same velocity value might be needed for that snare in another part of the arrangement where guitars and vocals is also playing.
To determine the necessary adjustment in velocity values, a person can use the decibel calculation. Two decibels might be the minimum adjustment needed for a musical part. Four decibels could be used to make a musical highlight within a song.
Using a calculator will tell a person the MIDI velocity value necessary to reach the target decibel level. The calculator will also provide a value for the resulting amplitude for that velocity setting. Dynamic markings in musical scores are still useful for MIDI controllers even if a person is programming each part of a song.
A marking of mezzo forte will indicate that a MIDI velocity between sixty-four and eighty-four should be used for that musical part on most sample libraries. If a person plays a MIDI velocity that is too low within this range, the sound may thin out. This is because most sample libraries will use a different sound for lower velocities.
If a person plays a velocity that is too high, the sound will be much more bright and the release will be longer. Maintaining the velocity within this range will make the part of the arrangement sound as if played by a live musician. To produce an accent for a snare drum or to produce ghost notes for the hi-hats, a velocity calculation will show a person how far they will be from the main part of the MIDI velocity range.
Within a MIDI controller, the compression settings for each musical part will pull the calculated MIDI velocity back towards a reference point in velocity settings. This is similar to a drummer dynamically playing each snare hit. By compressing the velocity, the calculated velocity of each note will always remain within the range of the MIDI velocity controller.
This can be helpful for forcing the velocity range of a musical part to match that of another part of the arrangement. However, it does remove some of the life from the part of the song. A person must decide how much of the original velocity range they are willing to keep in the programmed part.
A common mistake with MIDI controllers is to treat the velocity values as if they are an absolute volume control. If a person raises each velocity value of a musical part to one hundred twenty-seven, each sample within that part will be as loud as possible. However, this removes the life from the part of the arrangement because there will be no ability to contrast loud notes with quiet notes.
Another mistake is to leave the velocity values for each musical part clustered in the middle of the velocity range. By leaving the velocities within this range, the part will feel as if it belong within the rest of the arrangement. However, it will also produce static results.
A better approach is to decide which musical notes should be above or below the average MIDI velocity setting for the part. Then use a decibel calculation to determine if that adjustment is appropriate for that musical part. A person can load a musical part into a digital audio workstation and play the part against the rest of the arrangement.
During this playthrough, a person will note which parts of the musical part sound out of place within the arrangement. These MIDI velocities can then be plugged into a velocity to decibel calculator along with the current reference point and the target velocity change. The output of this calculation will tell a person if a small change in velocity will fix the problem with the part of the song or if a person needs to rethink the velocity curve for that musical part.
Once the calculated MIDI velocity values matches what a person hears from each musical part, that part will support the mix of the song instead of fighting against the mix.