Microphone Output Voltage Calculator
Estimate mic mV, dBV, and preamp headroom from SPL, sensitivity, and distance. Compare dynamic, condenser, and ribbon signal paths fast.
🎤 Mic Presets
🔧 Acoustic Inputs
🔌 Electronics Inputs
📊 Microphone Spec Grid
📑 Microphone Reference Tables
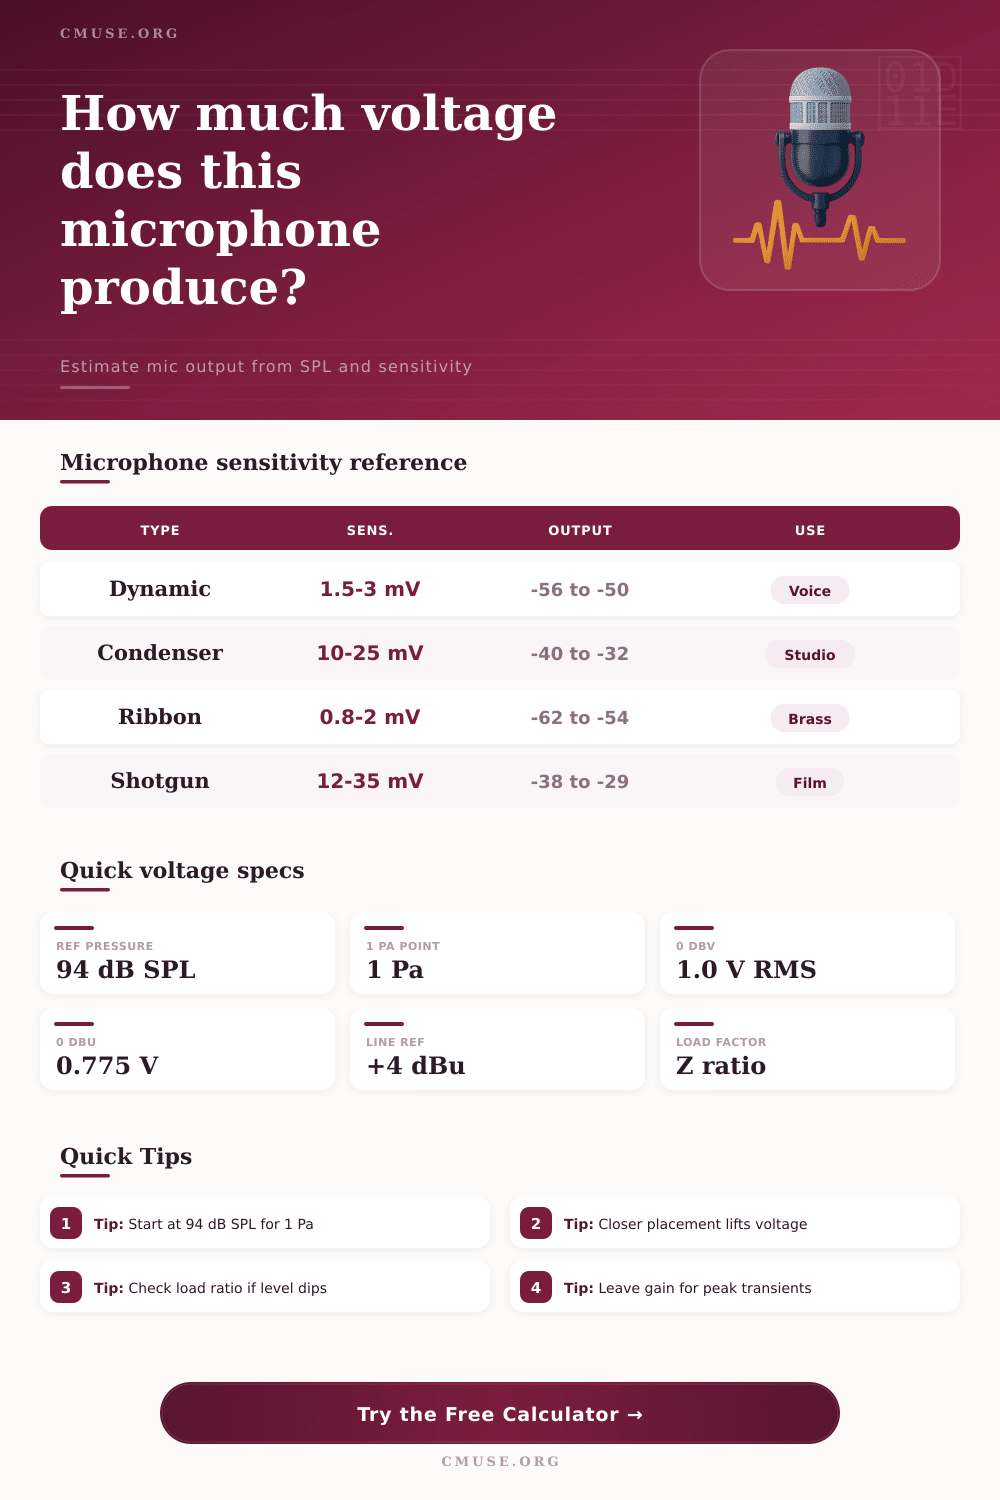
| Microphone type | Typical sensitivity | Source impedance | Common use |
|---|---|---|---|
| Dynamic moving coil | 1.5 to 3 mV/Pa | 150 to 300 ohm | Voice and snare |
| Large diaphragm condenser | 10 to 25 mV/Pa | 50 to 200 ohm | Studio vocals |
| Passive ribbon | 0.8 to 2 mV/Pa | 200 to 300 ohm | Brass and amp |
| Shotgun condenser | 12 to 35 mV/Pa | 100 to 250 ohm | Dialogue capture |
| SPL | Pressure | Voltage factor | Typical scene |
|---|---|---|---|
| 64 dB | 0.032 Pa | 0.032x | Quiet speech |
| 74 dB | 0.10 Pa | 0.10x | Close vocal |
| 84 dB | 0.32 Pa | 0.32x | Loud talk |
| 94 dB | 1.00 Pa | 1.00x | Reference |
| Level | RMS voltage | Signal note | Where it fits |
|---|---|---|---|
| -60 dBV | 1.00 mV | Very low | Quiet ribbon |
| -50 dBV | 3.16 mV | Low output | Dynamic voice |
| -40 dBV | 10.0 mV | Moderate | Studio condenser |
| -30 dBV | 31.6 mV | Hot signal | Strong close source |
| Gain target | dBu | Voltage | Practical use |
|---|---|---|---|
| Consumer line | -10 dBV | 0.316 V | Unbalanced gear |
| Pro line | +4 dBu | 1.228 V | Balanced path |
| Hot send | +10 dBu | 2.45 V | Strong interface |
| Headroom check | +20 dBu | 7.75 V | Peak margin |
Microphones converts the sound pressure wave into electrical voltage, which acts as a connection between the sound source and the mixing system. Understanding how microphones convert sound pressure to voltage is essential, as the amount of voltage that a microphone will produce will determine the amount of gain that you’ll have to apply to a preamplifier. The sensitivity of a microphone determines the amount of voltage that the microphone produce when exposed to a specific amount of sound pressure.
The sensitivity of a microphone is measured in millivolts per pascal at 94 decibels of sound pressure levels. The amount of voltage that a microphone produces is different than microphone to microphone. For example, dynamic microphones will produce around 2 millivolts of voltage at the reference sound pressure level, while condenser microphone will produce 20 millivolts of voltage.
How Microphones Turn Sound Into Voltage
Condenser microphones will have to suffer from less gain from a preamplifier than dynamic microphones due to the higher voltage that they produces. The amount of sound pressure that hit the microphone capsule will vary based off the distance between the sound source and the microphone. The more far the microphone is from the sound source, the less sound pressure will hit the microphone diaphragm, resulting in less voltage being produced by the microphone.
The distance of the microphone from the sound source will also play a role in the microphones frequency response due to something call the proximity effect. If the sound pressure is very high, condenser microphones will suffer from an increase in low frequencies in their sound output. This will result in a different sound from the microphone when it is close to the sound source than when it is positioned at a distance from that sound source.
The proximity effect can be utilized in the recording process to control the amount of voltage and tonal quality that the microphone produces. The relationship between a microphone and a preamplifier is based on the electrical unit of impedance. The output impedance of a microphone is different from the input impedance of a preamplifier.
The input impedance should be much higher than the output impedance to avoid any loss of voltage from the microphone. If the impedance of the preamplifier is too low for the microphone, there will be a voltage drop that results in a loss of signal strength from the microphone that travel to the preamplifier. The microphone and cable can cause signal loss, especially if the cable is very long.
A pad can be used to reduce the microphones voltage level if the sound source is too loud for the microphone or the following preamplifier. The microphone’s level can be expressed in several units. Mic RMS voltage is the voltage that the microphone produces when there is no load on the microphone.
When the preamplifier loads the microphone, the microphone will produce loaded voltage. Microphones can be expressed in units of dBV for raw microphone levels. The levels will typically be a negative dBV due to the low voltage that are produced by the microphone.
For preamplifiers, the unit of dBu is used to express the output level of the device. When recording sound, it is important to consider the crest factor between the peak voltage and the RMS voltage of the signal. Drums has a high crest factor and will produce large peaks in the voltage of the signal so that they can be properly captured with adequate headroom in the preamplifier.
Depending on the task that you wish to accomplish with a microphone, there are different types of microphones that can be used. Ribbon microphones has low sensitivity and will produce very little voltage. This means that high gain will be required from a preamplifier if using a ribbon microphone.
Shotgun microphones have high sensitivity, meaning they will produce a high amount of voltage. Condenser microphones are used for studio recordings because they create high voltage levels and require less gain, thus introducing less noise to the recording. Dynamic microphones are used live because they are more rugged and dont require phantom power.
Many people will make a mistake of not accounting for sound pressure at the reference distance of the microphone. If the sound source is too quiet, such as speech at 64 decibels, the microphone will produce low levels of voltage. The gain will have to be increased for the signal to be loud enough to be processed by the audio mixing system.
Headroom has to be provided for the microphone and preamplifier to avoid clipping the signal. Clipping of the signal occur when the voltage from the microphone or the preamplifier reaches the maximum voltage that the audio device can handle. Headroom must be provided for the microphone and preamplifier to avoid clipping the signal.
An understanding of the relationship between sound pressure and voltage from a microphone will allow sound engineer to make better decisions regarding microphone placement and preamplifier settings.